Step-by-Step Guide for Event Organisers
Introduction
Creating an event on Ticmint is simple. This guide walks you through the complete process, from accessing the event creation page to configuring tickets and publishing your event.
Follow the steps below to set up your event and make it available for attendees.
1. Before You Start
Keep the following information ready before creating your event:
Event name and description
Event date and time
Event banner and promotional images
Venue details or online meeting information
Ticket names, prices and quantities
Organiser/organisation details
Having these details ready will make the event creation process easier.
2. Access the Event Creation Page
Log in to your Ticmint account.
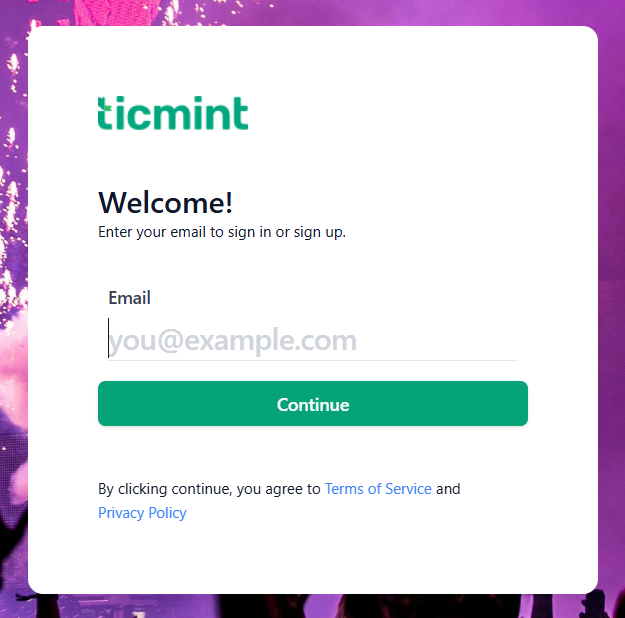
Login Page
Navigate to the Dashboard.
Click on Create Event.
You will be redirected to the event creation page.
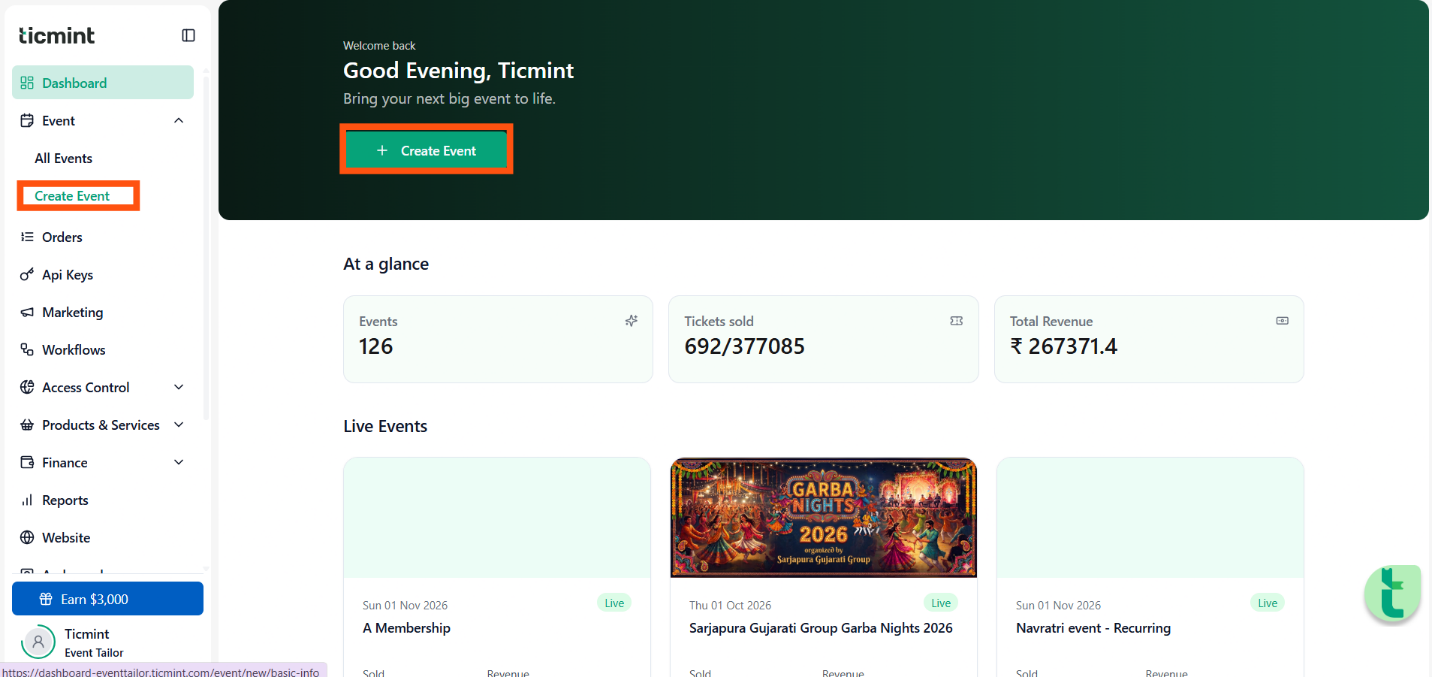
Click on + Create Event or Create Event
3. Upload Event Images
Upload images that represent your event. These images will appear on different sections of the Ticmint platform.
Click + Add an Image and upload the required images.
Recommended Image Dimensions
Tips:
Use high-quality images.
Ensure that important text and event details are not cropped.
Use images that clearly represent your event.
Avoid uploading blurry or stretched images.
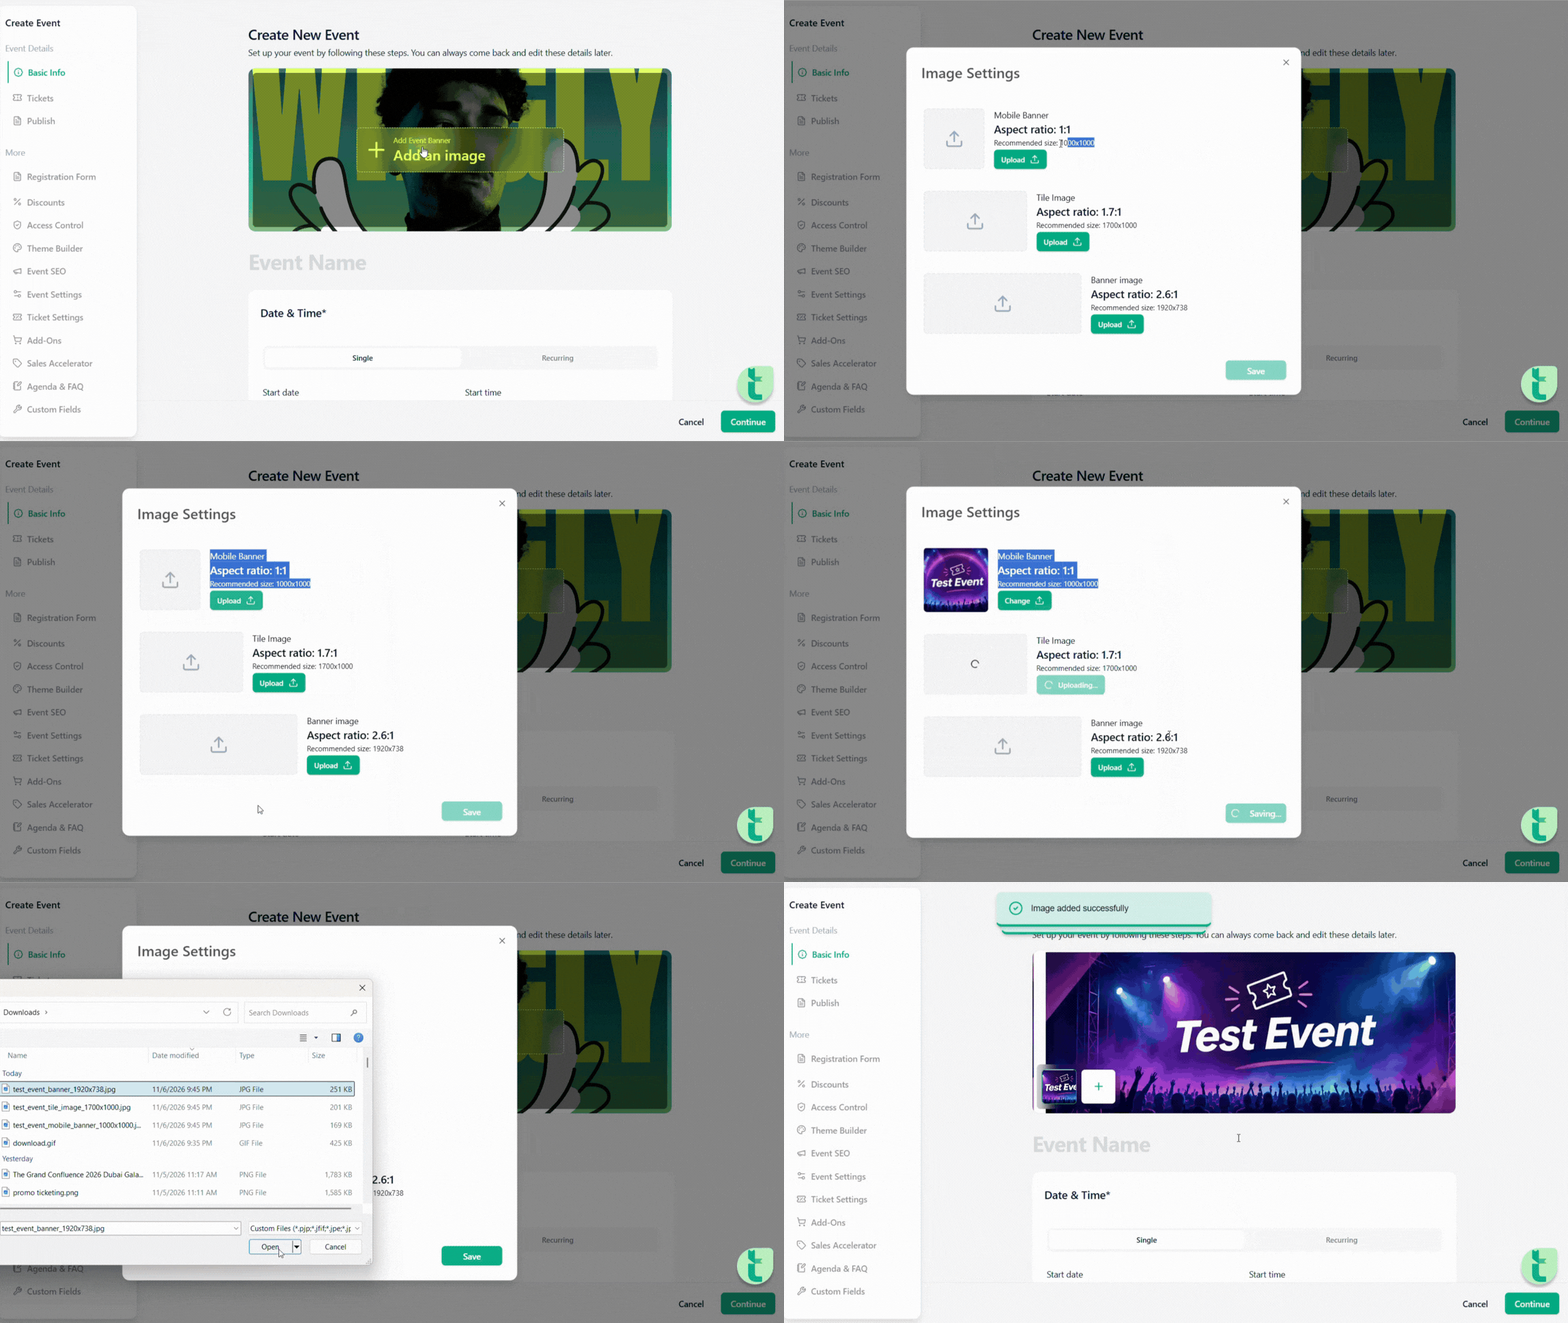 Uploading Event Images
4. Enter Event Details
Provide the basic information about your event.
4.1 Event Name
Enter the name of your event.
Example: Summer Music Festival 2027.
Use a clear and easily recognizable event name.
4.2 Event Date and Time
Select the event start date, end date and corresponding timings.
Ensure that the selected timezone is correct so attendees see the appropriate event schedule.
4.3 Event Type
Choose the event type based on your event schedule.
Single Event
Select this option if your event takes place on one specific occasion or date.
Recurring Event
Select this option if your event takes place repeatedly according to a schedule.
Configure the required recurring dates and timings.
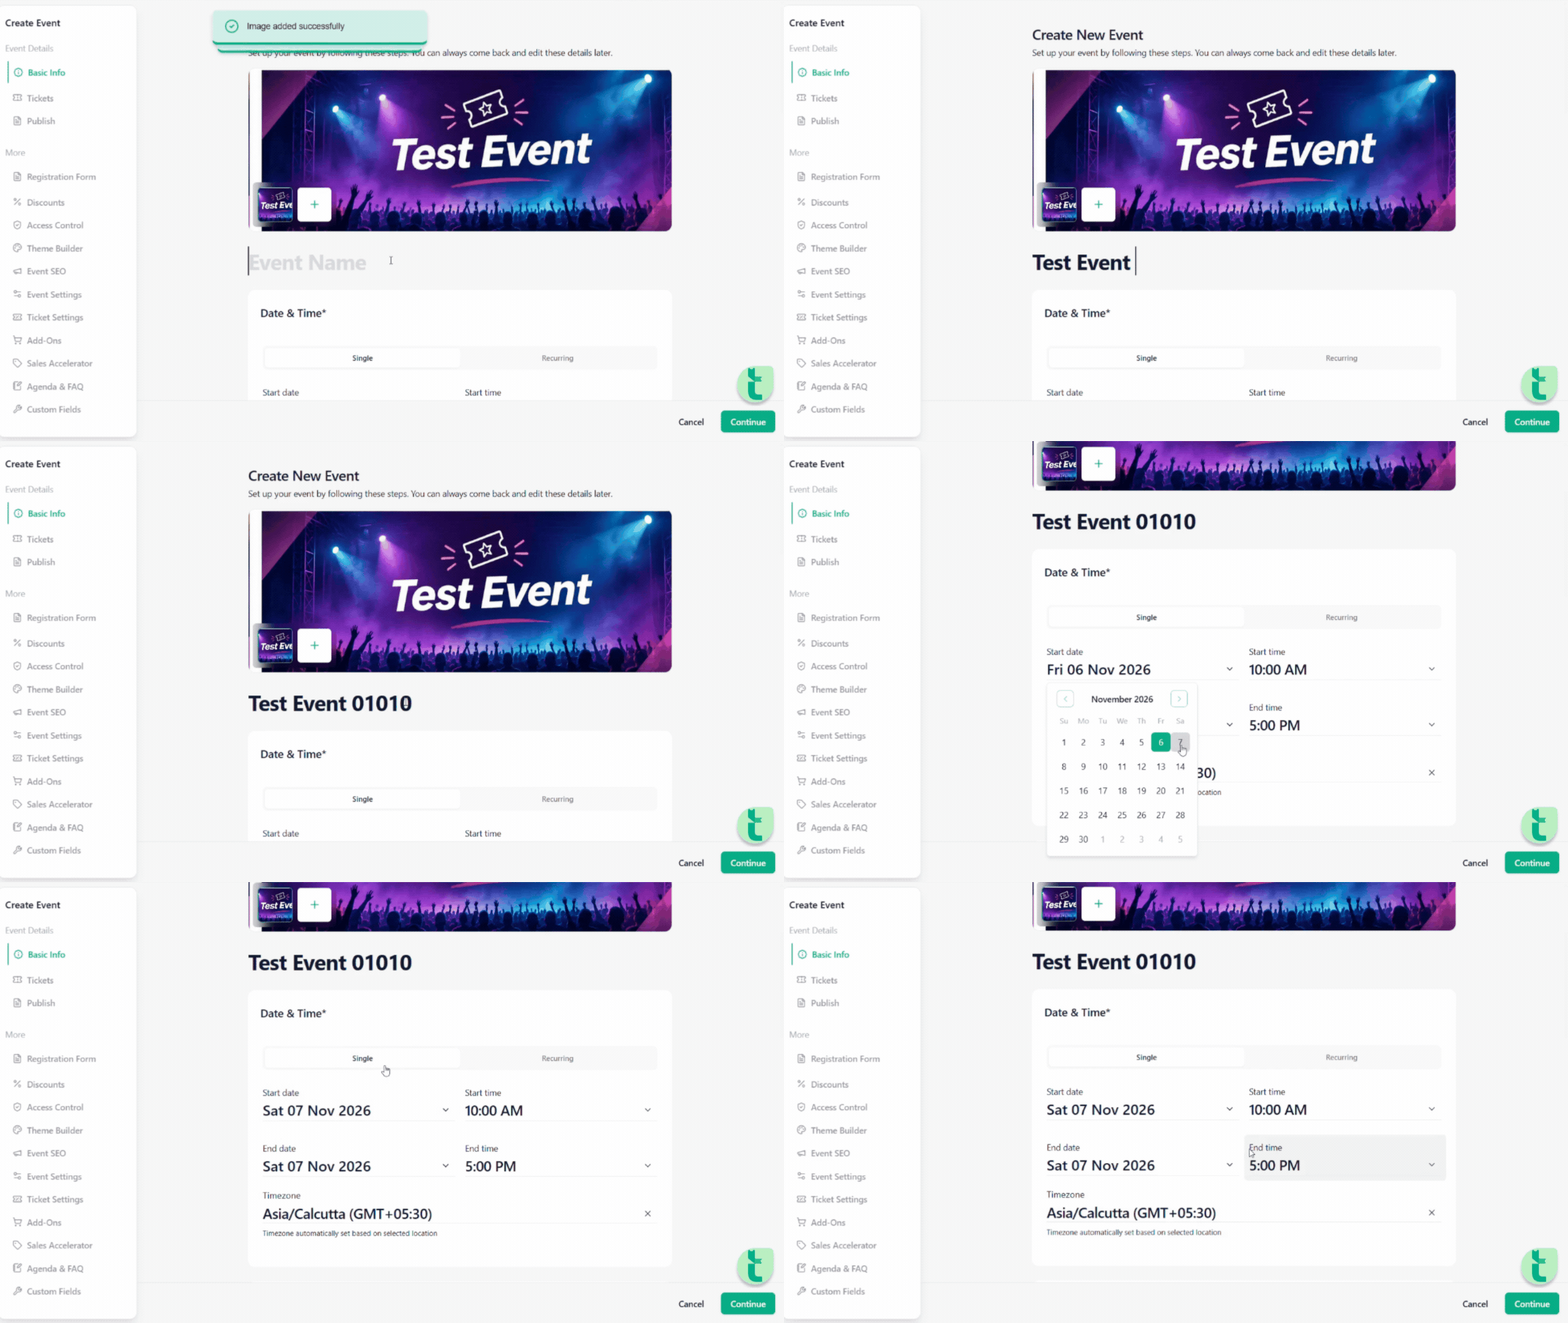 Event name and Date &Time
5. Set Event Location
Choose where your event will take place.
5.1 Venue Event
Select Venue if your event is conducted at a physical location.
Select Venue.
Search using the venue name, address or location details.
Select the correct venue from the available search results.
Verify the location before proceeding.
5.2 Online Event
Select Online if your event is conducted virtually.
Select Online.
Choose the preferred online platform.
Enter the Meeting Link.
Enter the Meeting ID, if applicable.
Enter the Passcode, if applicable.
Ensure that the meeting information is correct so attendees can access the event.
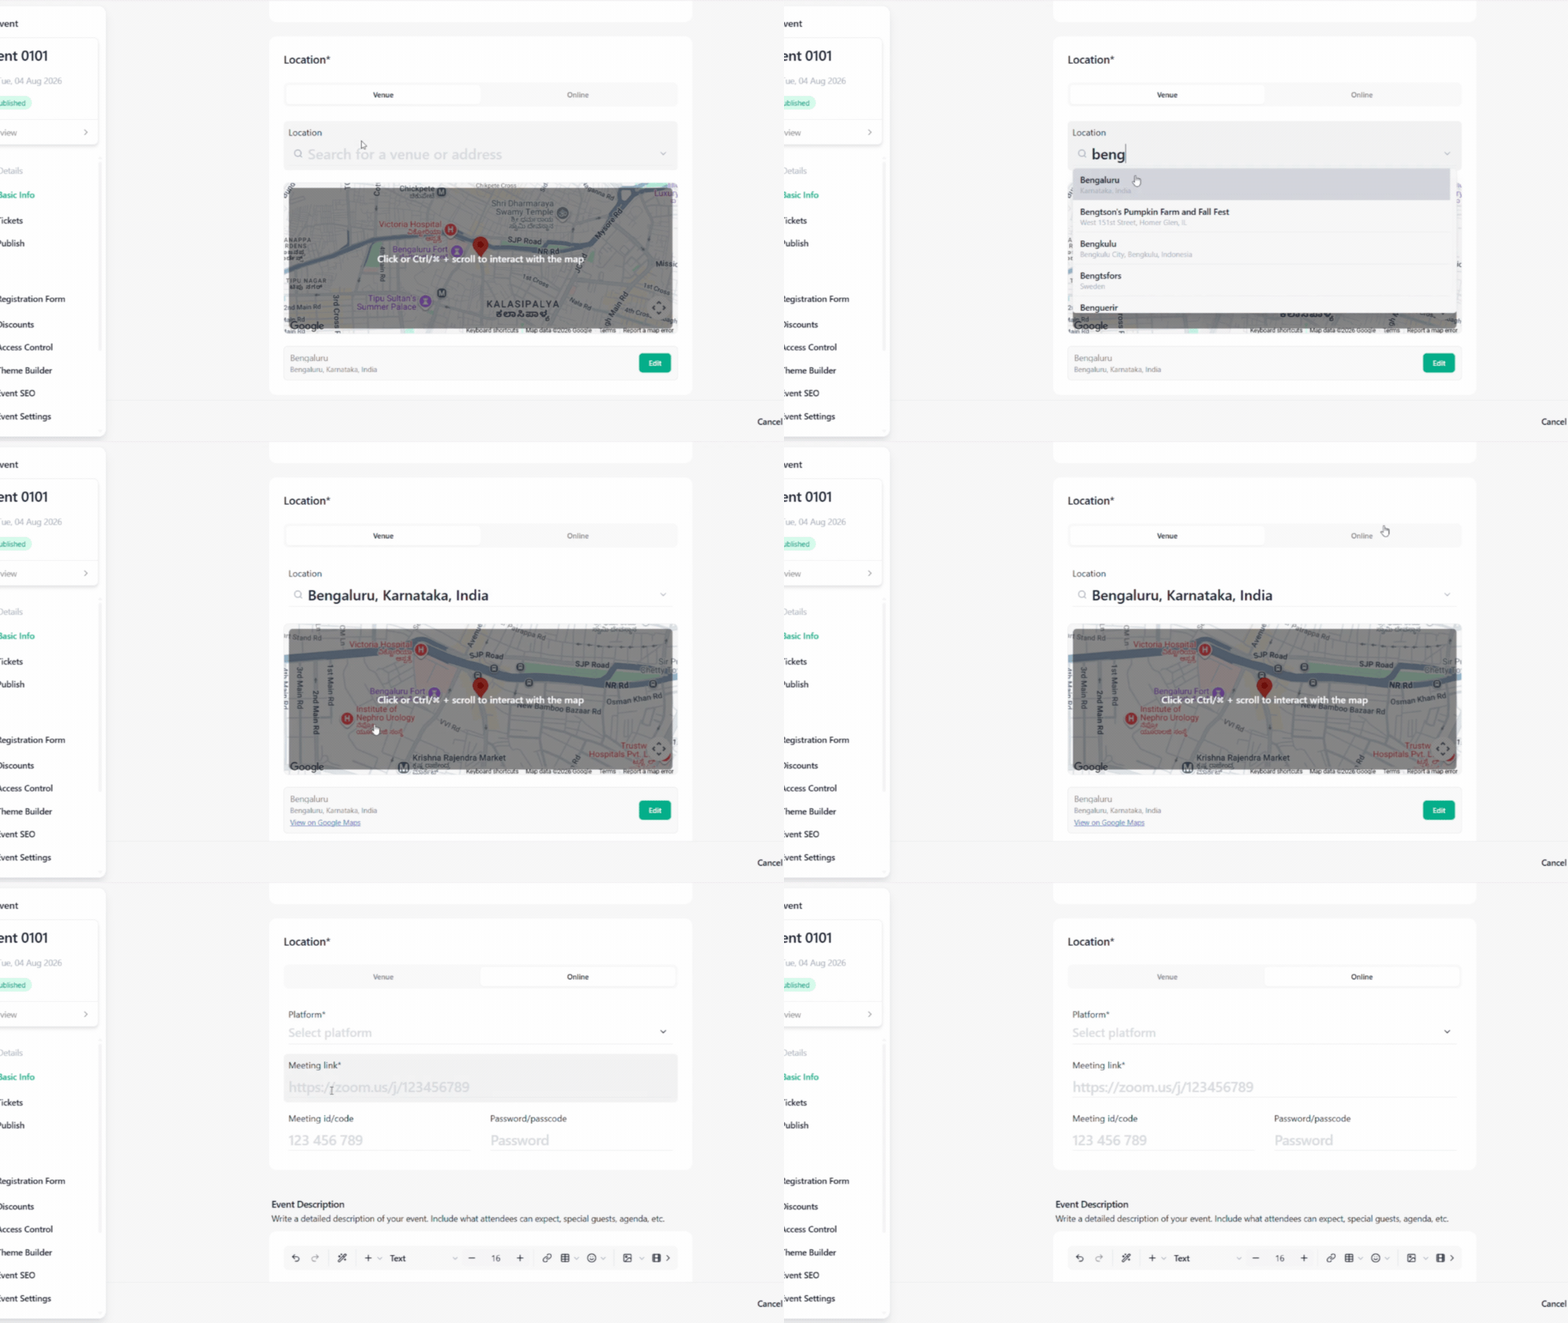 Event Location
6. Add Event Description
Enter a detailed description explaining your event.
Include relevant information such as:
About the event
Event highlights
Performers, speakers or participants
Event schedule or agenda
Important instructions for attendees
Terms and conditions, where applicable
You can use the available editor tools to format your description.
The editor supports options such as:
Text formatting and styling
Adding images
Adding hyperlinks
Creating bullet points and lists
Undo and redo
AI-assisted content generation
Tip: Keep the description clear and informative. Attendees should understand what the event is about before purchasing tickets or registering.
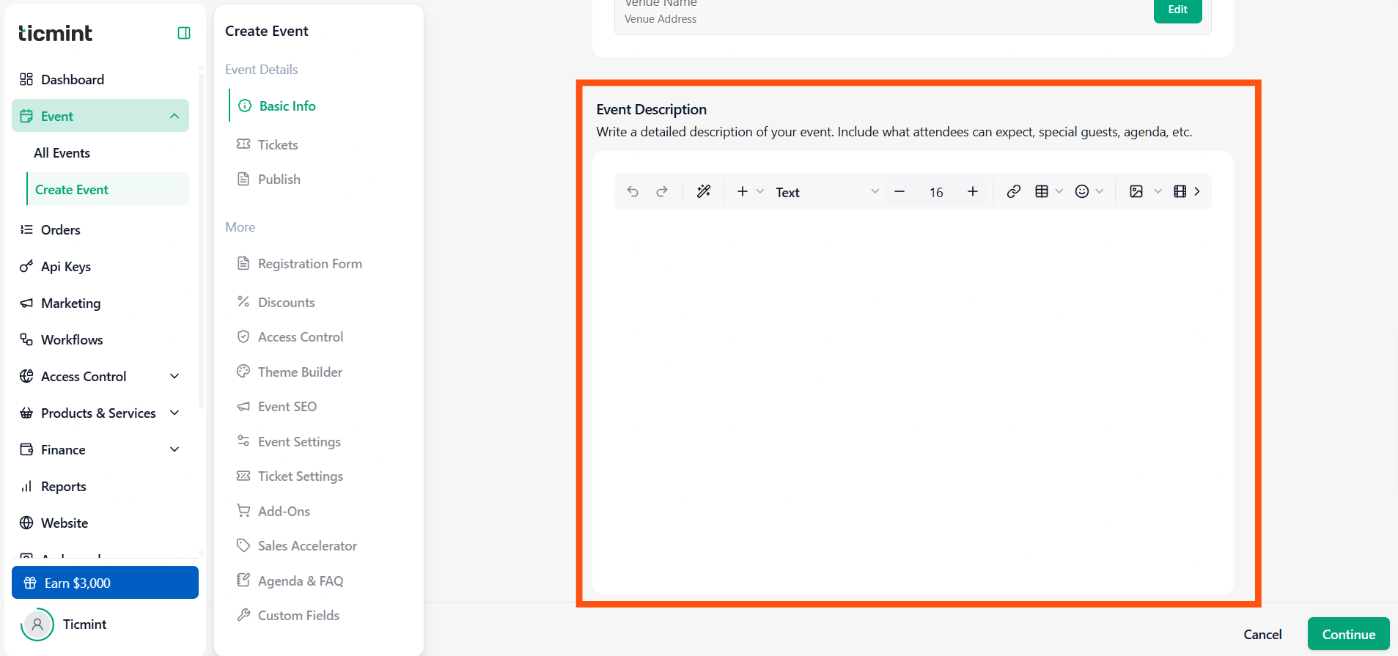
Event Description
7. Select Organisation
Choose the organisation under which the event should be created.
Locate the Organisation selection field.
Select the appropriate organisation.
Verify that the correct organisation is selected before continuing.
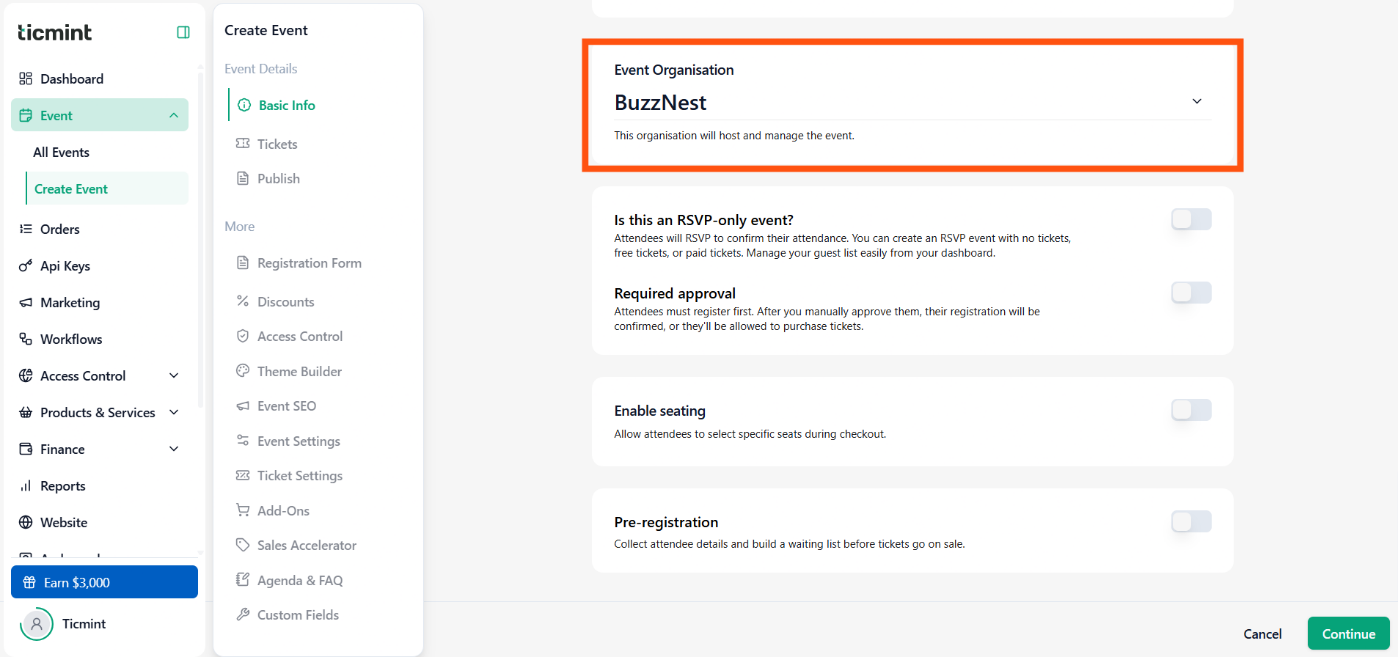
Event Organisation
8. Configure Optional Event Settings
Depending on your event requirements, you can enable the following options.
8.1 RSVP-Only Event
Enable this option if attendees need to confirm their attendance through RSVP.
RSVP events can be configured with:
No tickets
Free tickets
Paid tickets
Choose the appropriate configuration based on your event requirements.
8.2 Required Approval
Enable this option if attendee registrations require manual approval.
This is useful for events where organisers need to review and approve registrations before confirmation or ticket purchase.
8.3 Enable Seating
Enable this option if attendees need to select specific seats during checkout.
This is useful for events with assigned seating arrangements, such as conferences, concerts and theatre events.
8.4 Pre-Registration
Enable this option to Collect attendee details and build a waiting list before tickets go on sale.
Allow attendees to register their interest before ticket sales begin, helping organisers collect attendee details and build a waiting list in advance.
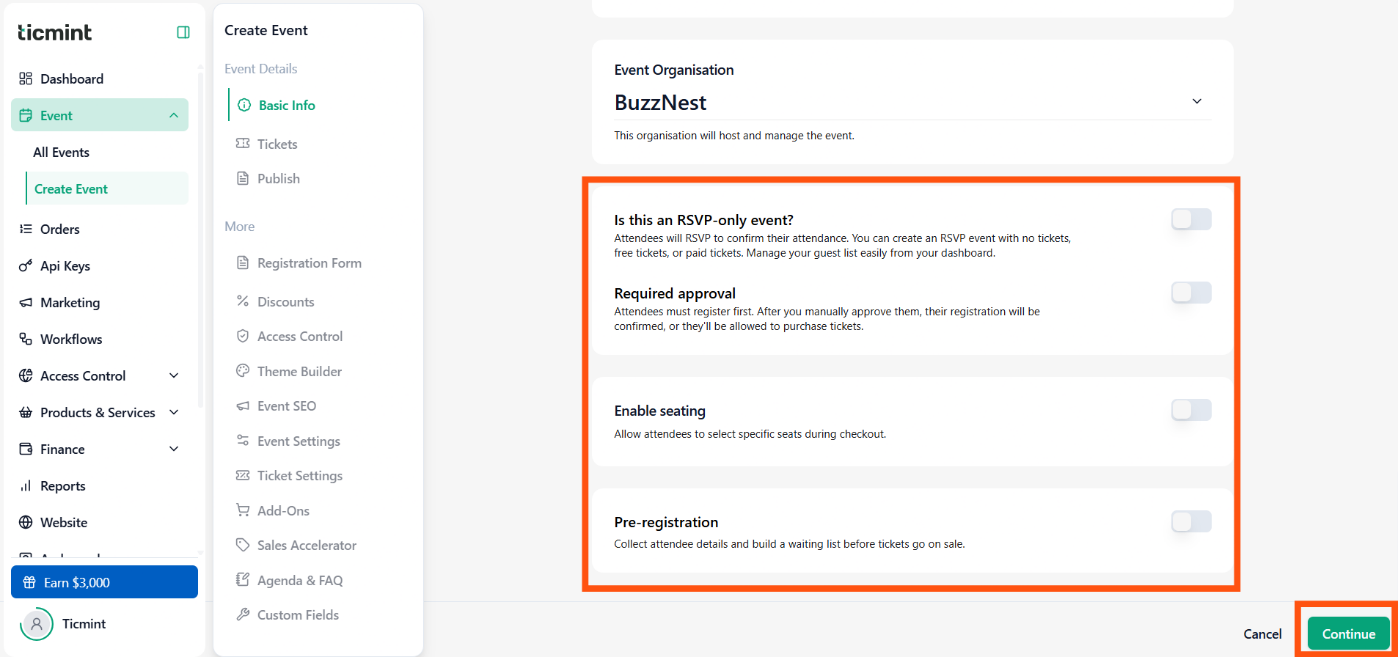
Enable options if required and click on continue
After configuring the required options, review the information and click Continue to save your event details.
9. Create Sections and Ticket Types
Once your event details are saved, configure the sections and ticket types.
Sections help organise different ticket categories under one event.
For example:
General Admission
VIP
Early Bird
Premium Seating
If you do not require multiple sections, you can skip creating section names and configure the capacity as applicable.
9.1 Create a Section
Click + Add Section to create a new section. (For newly creating events, a default ticket section will be displayed)
Enter the Section Name.
Enter the Section Capacity.
Upload a Section Image, if required.
Click Save.
What is Section Capacity?
Section Capacity represents the maximum capacity configured for that section. Plan the capacity according to the number of attendees you intend to accommodate.
Example:
General Admission – 500
VIP – 100
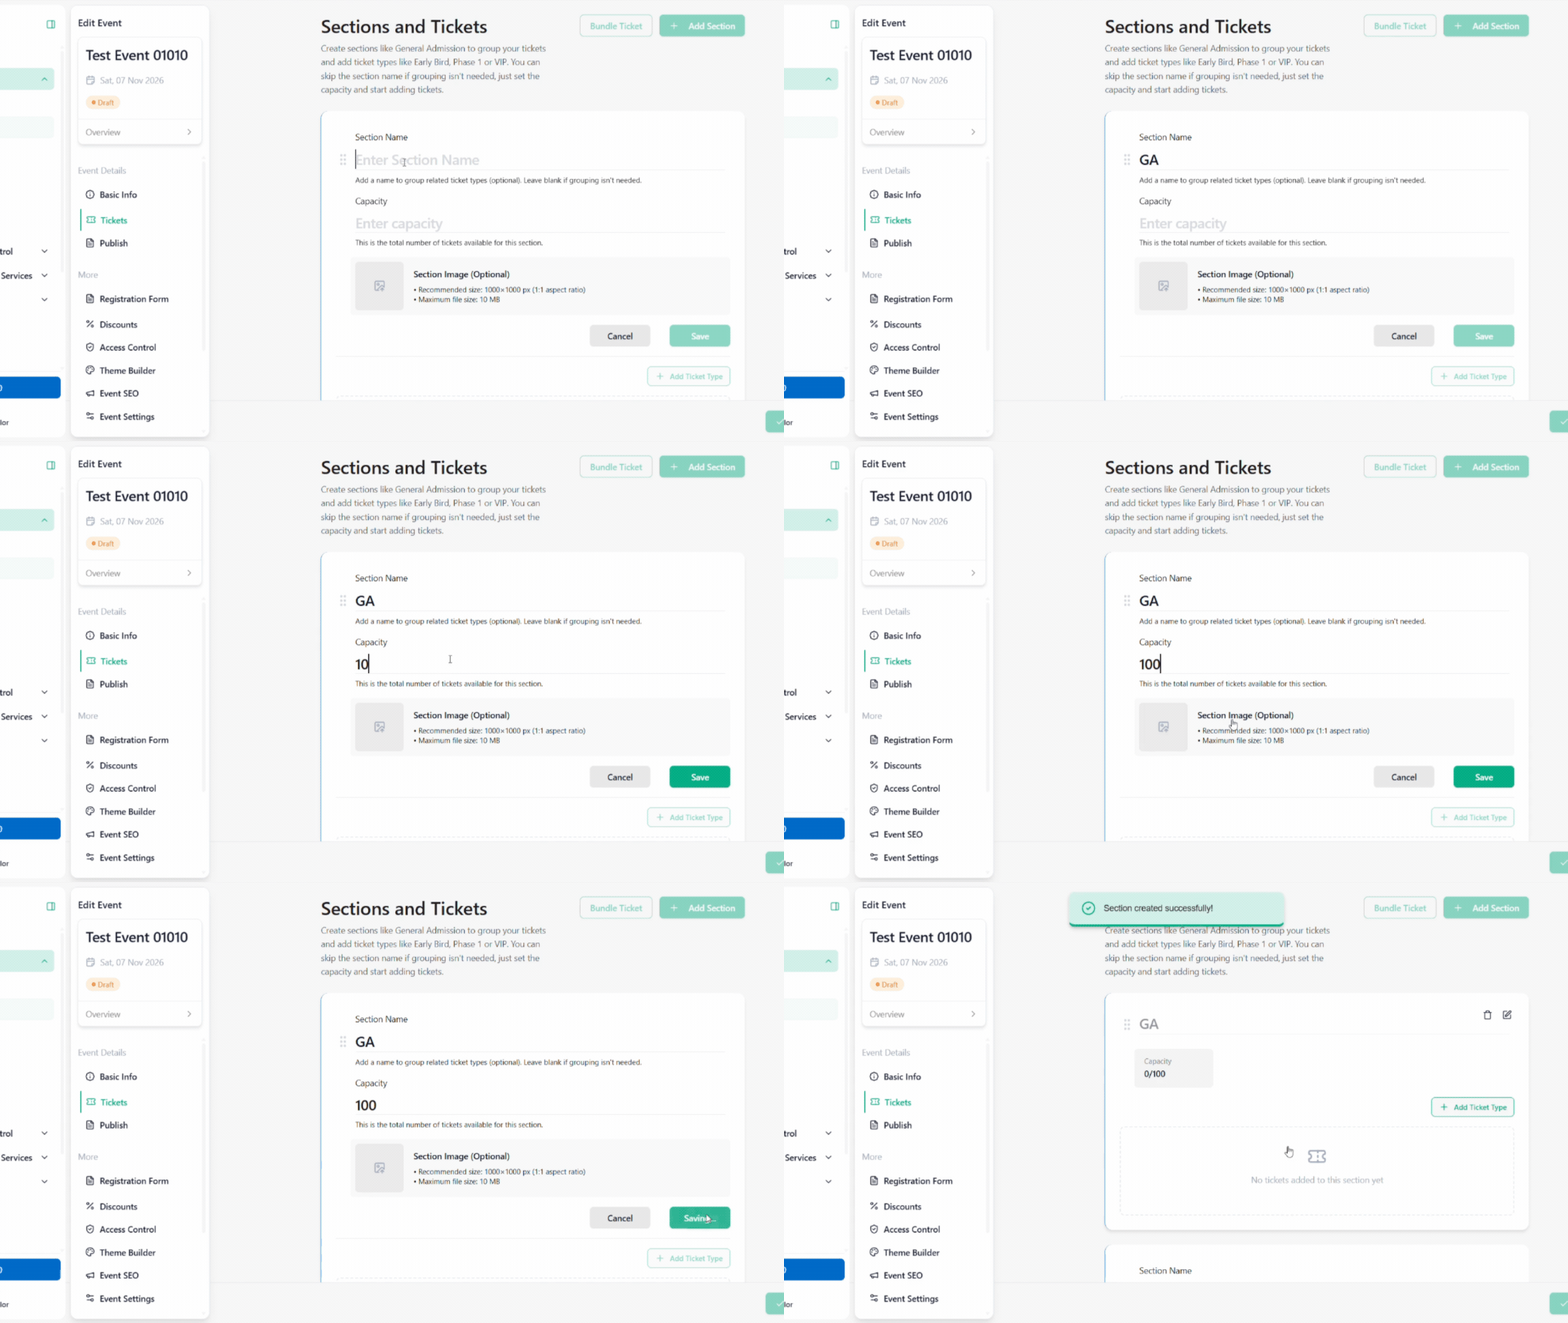
Creating Section
9.2 Add Ticket Types
After creating a section:
Click Add Ticket Type.
Enter the Ticket Name.
Enter the Ticket Limit.
Enter the Ticket Price.
Click View to check the price breakdown.
Select the required Ticket Visibility from the dropdown.
Enable Restrict visibility to sales period if required. When enabled, this ticket category will only be shown during the configured sales period.
Save the ticket.
Example:
What is Ticket Limit?
Ticket Limit determines the quantity configured for an individual ticket type.
Important: Section Capacity and Ticket Limit are different settings. Configure both according to your event's overall capacity and ticket allocation.
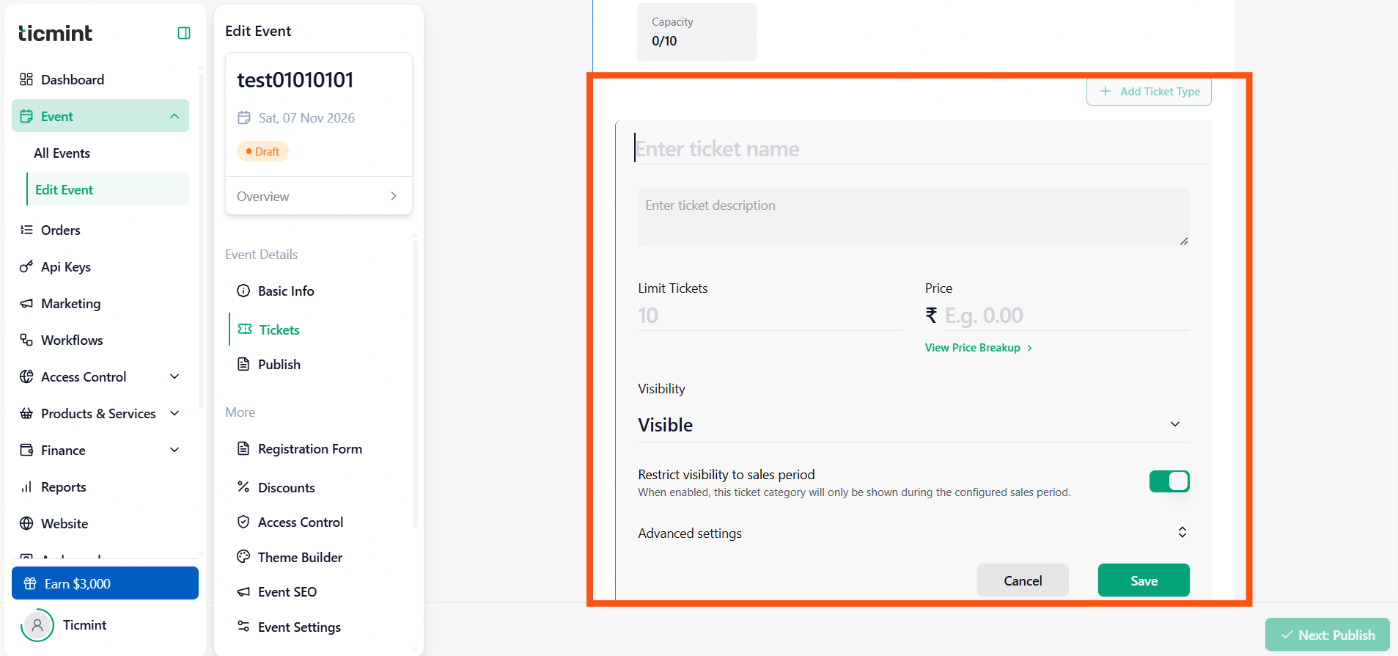
Adding Ticket and details
10. Configure Advanced Ticket Settings
Click Advanced Settings to configure additional ticket options.
10.1 Tax Configuration
You can configure taxes using either of the following options.
Use Existing Tax
Select Existing Tax.
Choose the required tax from the Select Tax dropdown.
Create New Tax
Select Create New Tax.
Select the Region.
Enter the Tax Label.
Enter the Tax Rate (%).
Review the tax configuration before saving.
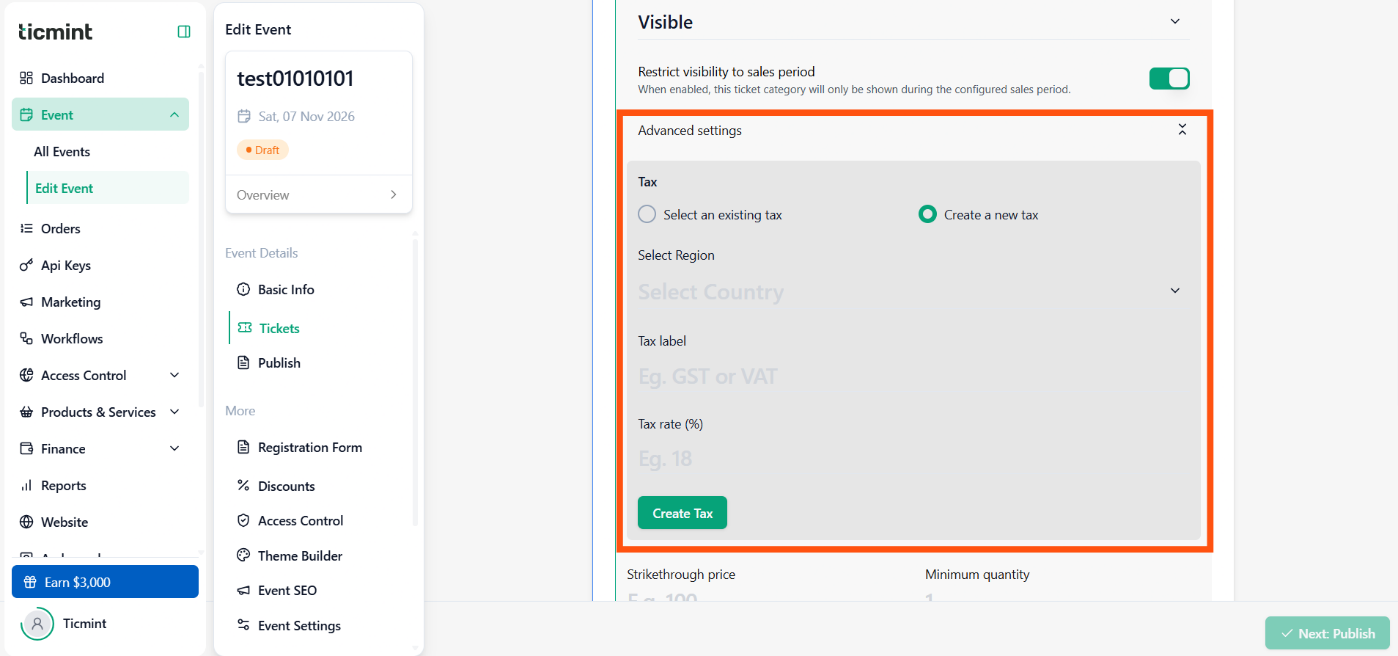
Tax configuration
10.2 Additional Ticket Settings
Configure the following options according to your event requirements.
Ticket Type Image
You can also upload an image for the ticket type.
Recommended specifications:
Image Size: 1000 × 1000 px
Aspect Ratio: 1:1
Maximum File Size: 10 MB
After configuring the required settings, click Save.
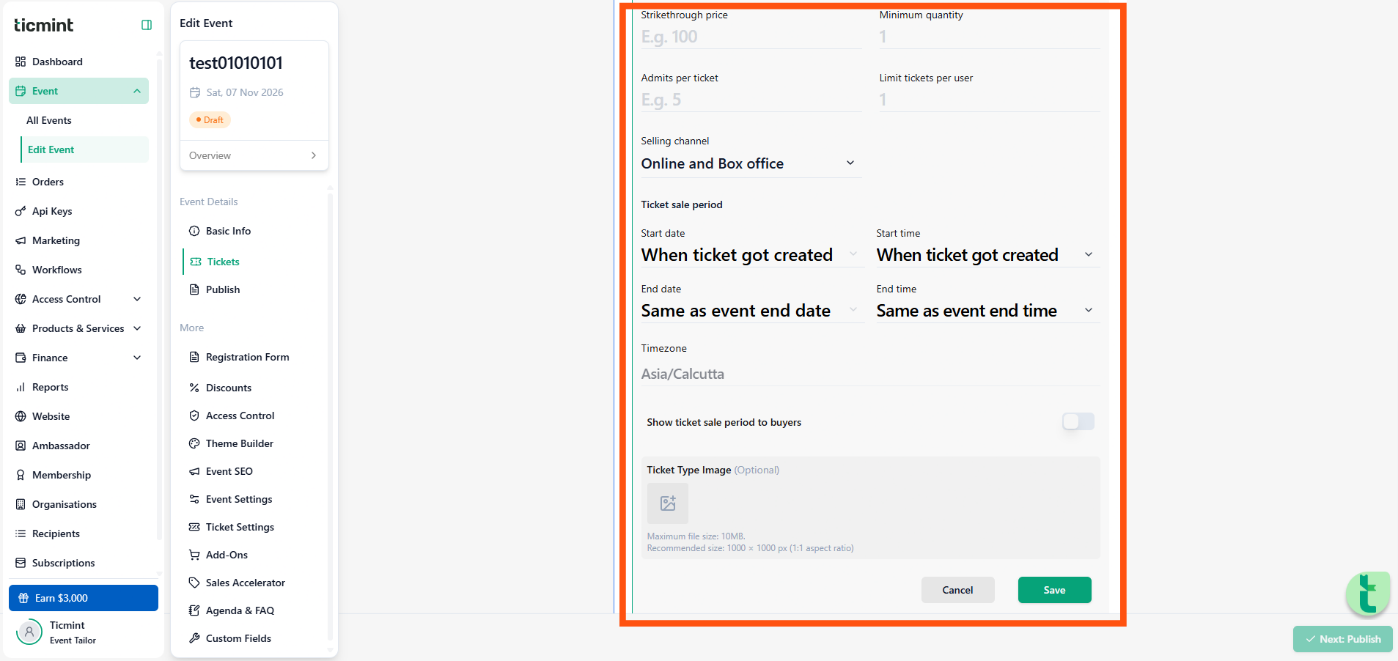
Advanced Ticket Settings
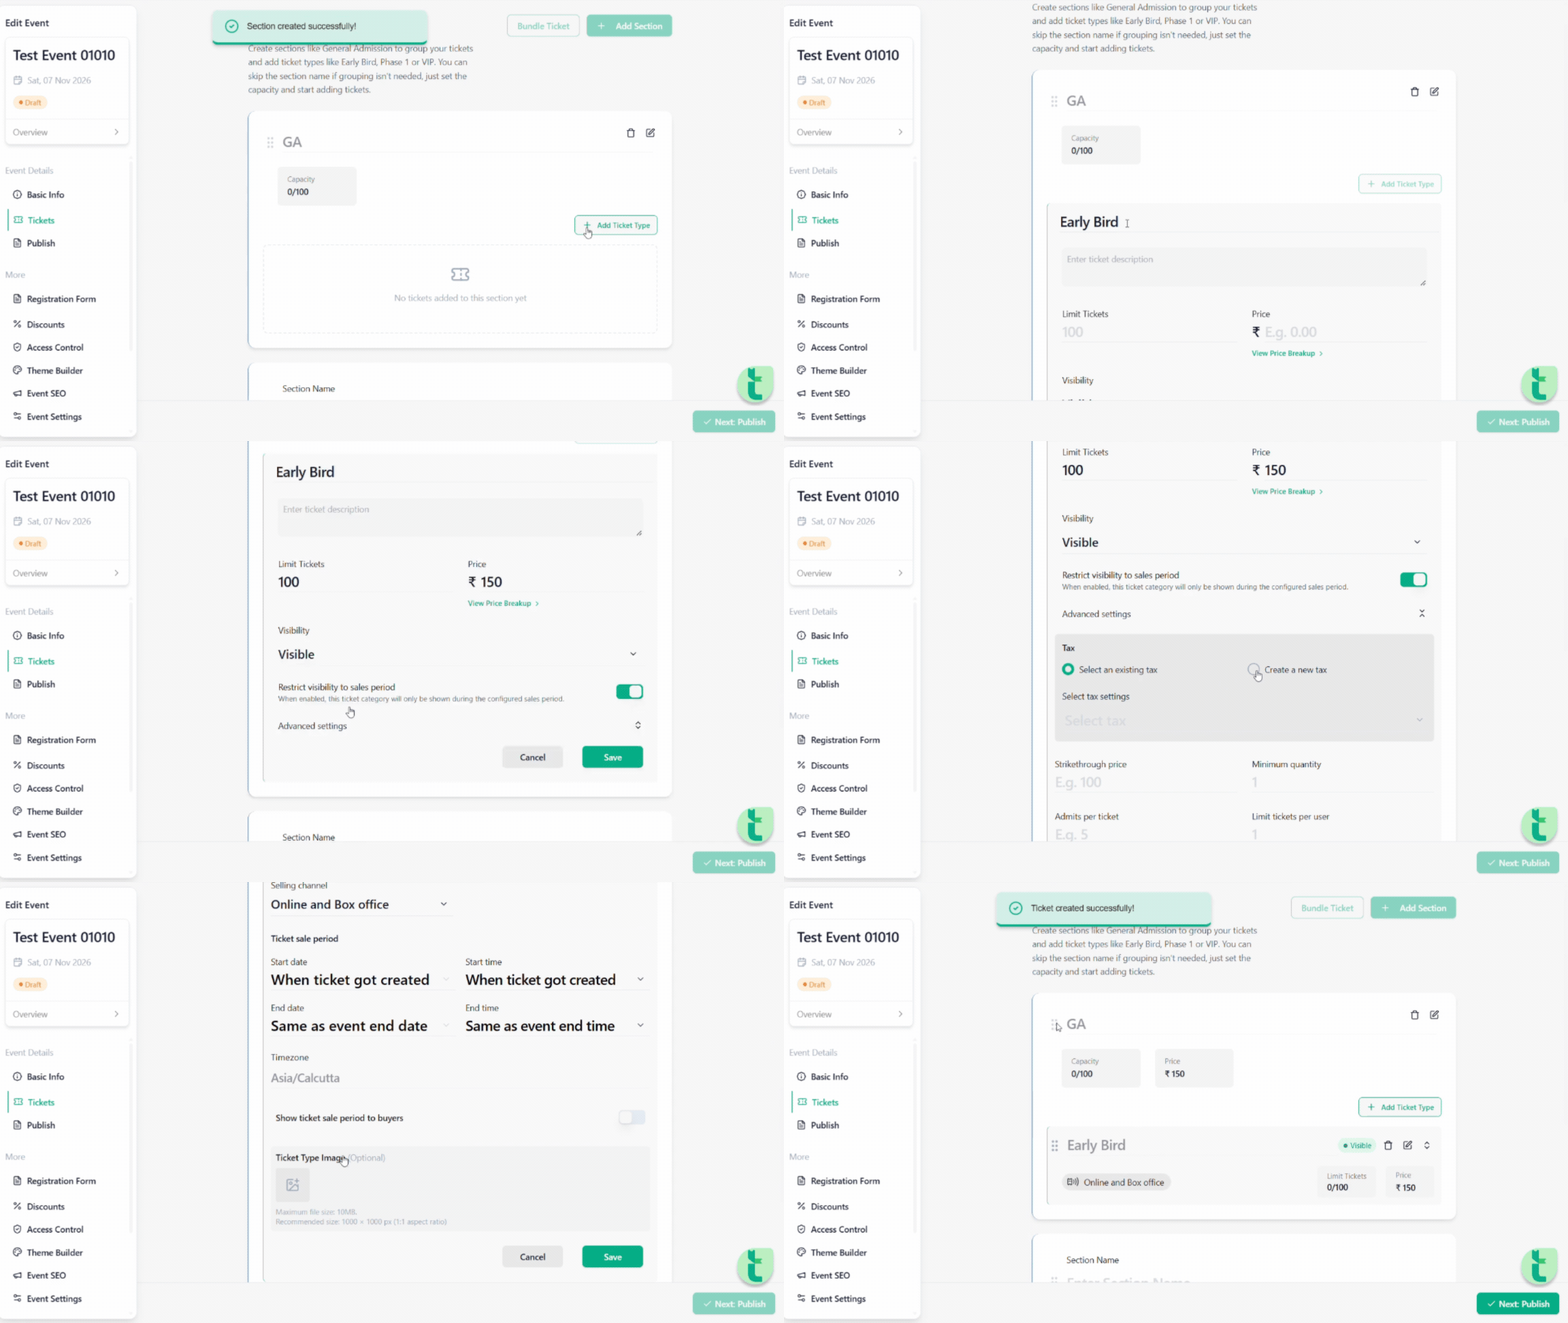 Creating Ticket
10.3 Create Additional Sections
If your event has multiple ticket categories:
Click + Add Section.
Enter the section name and capacity.
Add the required ticket types.
Configure the ticket settings.
Repeat the process for all required sections.
Example:
Section 1 – General Admission
Early Bird
Regular
Section 2 – VIP
VIP Pass
Premium Pass
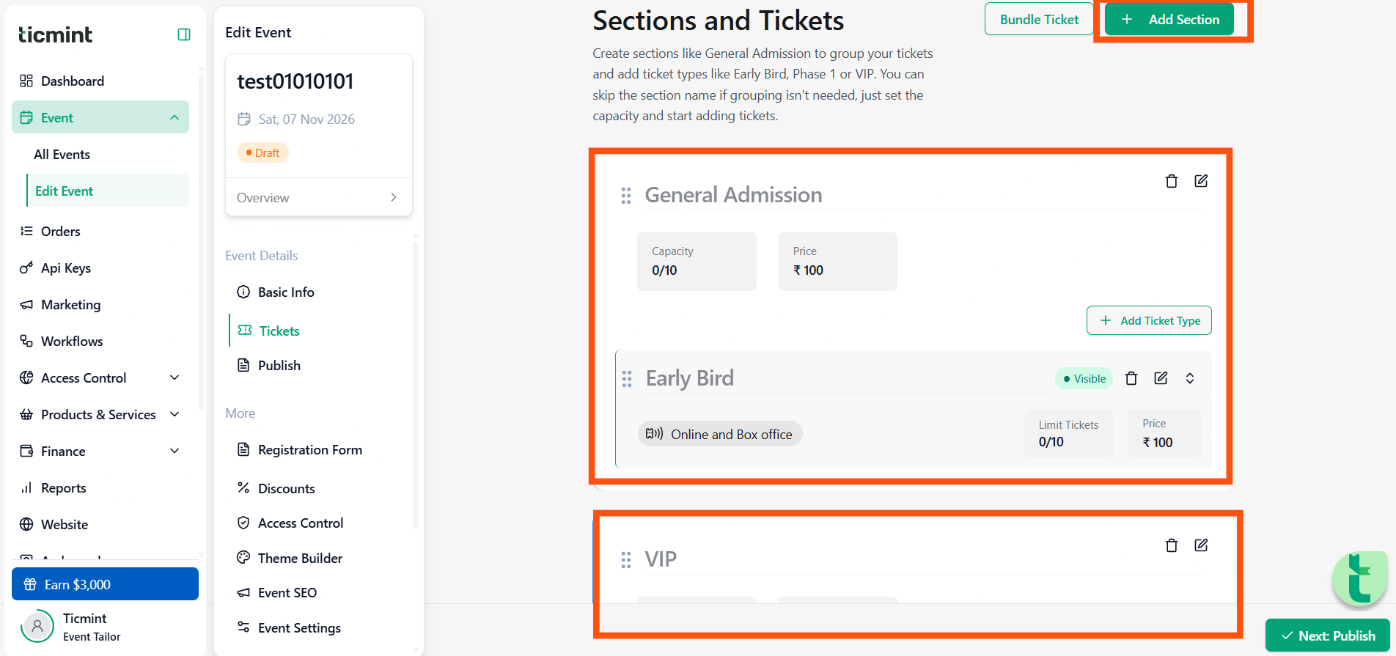
Event showing multiple sections and ticket types
11. Review and Publish Your Event
After completing the event details and ticket configuration, you can proceed to publish your event.
Click Publish to access the publishing options.
Before publishing, review your event carefully.
11.1 Preview Your Event
Click View Event to preview how your event will appear to attendees.
Check the following:
Event name and description
Event banner and images
Date, time and location
Ticket names and prices
Ticket availability
Registration and checkout experience
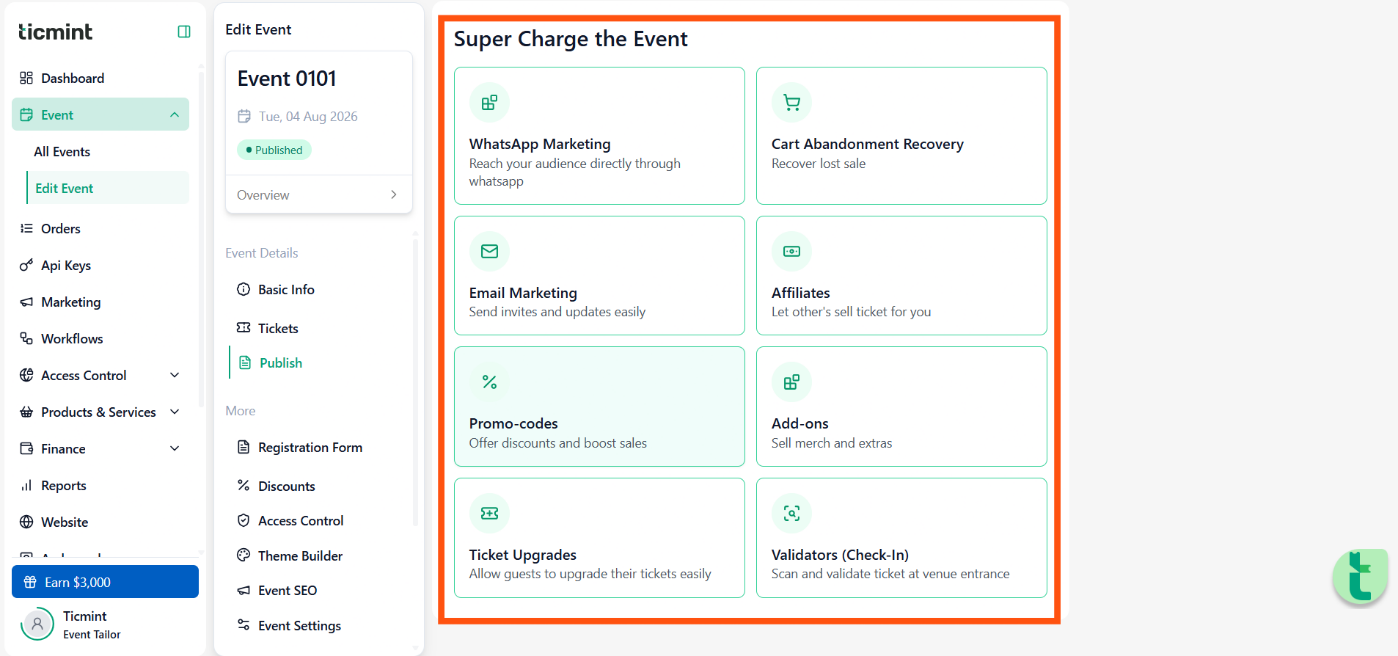
Also configure additional features if required:
Promo Codes
Registration Form
Discounts
Access Control
Theme Builder
Event SEO
Event Settings
Ticket Settings
Add-Ons
Sales Accelerator
Agenda & FAQ
Custom Fields
11.2 Choose Event Visibility
You can choose between the following visibility options.
Public Event
The event will be listed on Ticmint.
Attendees can discover the event through the platform.
The event can be discovered through search engines.
Private Event
The event will only be accessible to the selected audience.
It is suitable for invitation-only or restricted-access events.
11.3 Choose Publishing Time
You can choose when your event should become available.
Publish Now
Select this option to make your event live immediately.
Schedule for Later
Select Schedule for Later.
Choose the required publishing date.
Select the publishing time.
Enable Schedule Unpublish Date if you want the event to be unpublished automatically at a specified date and time.
Click Publish Later.
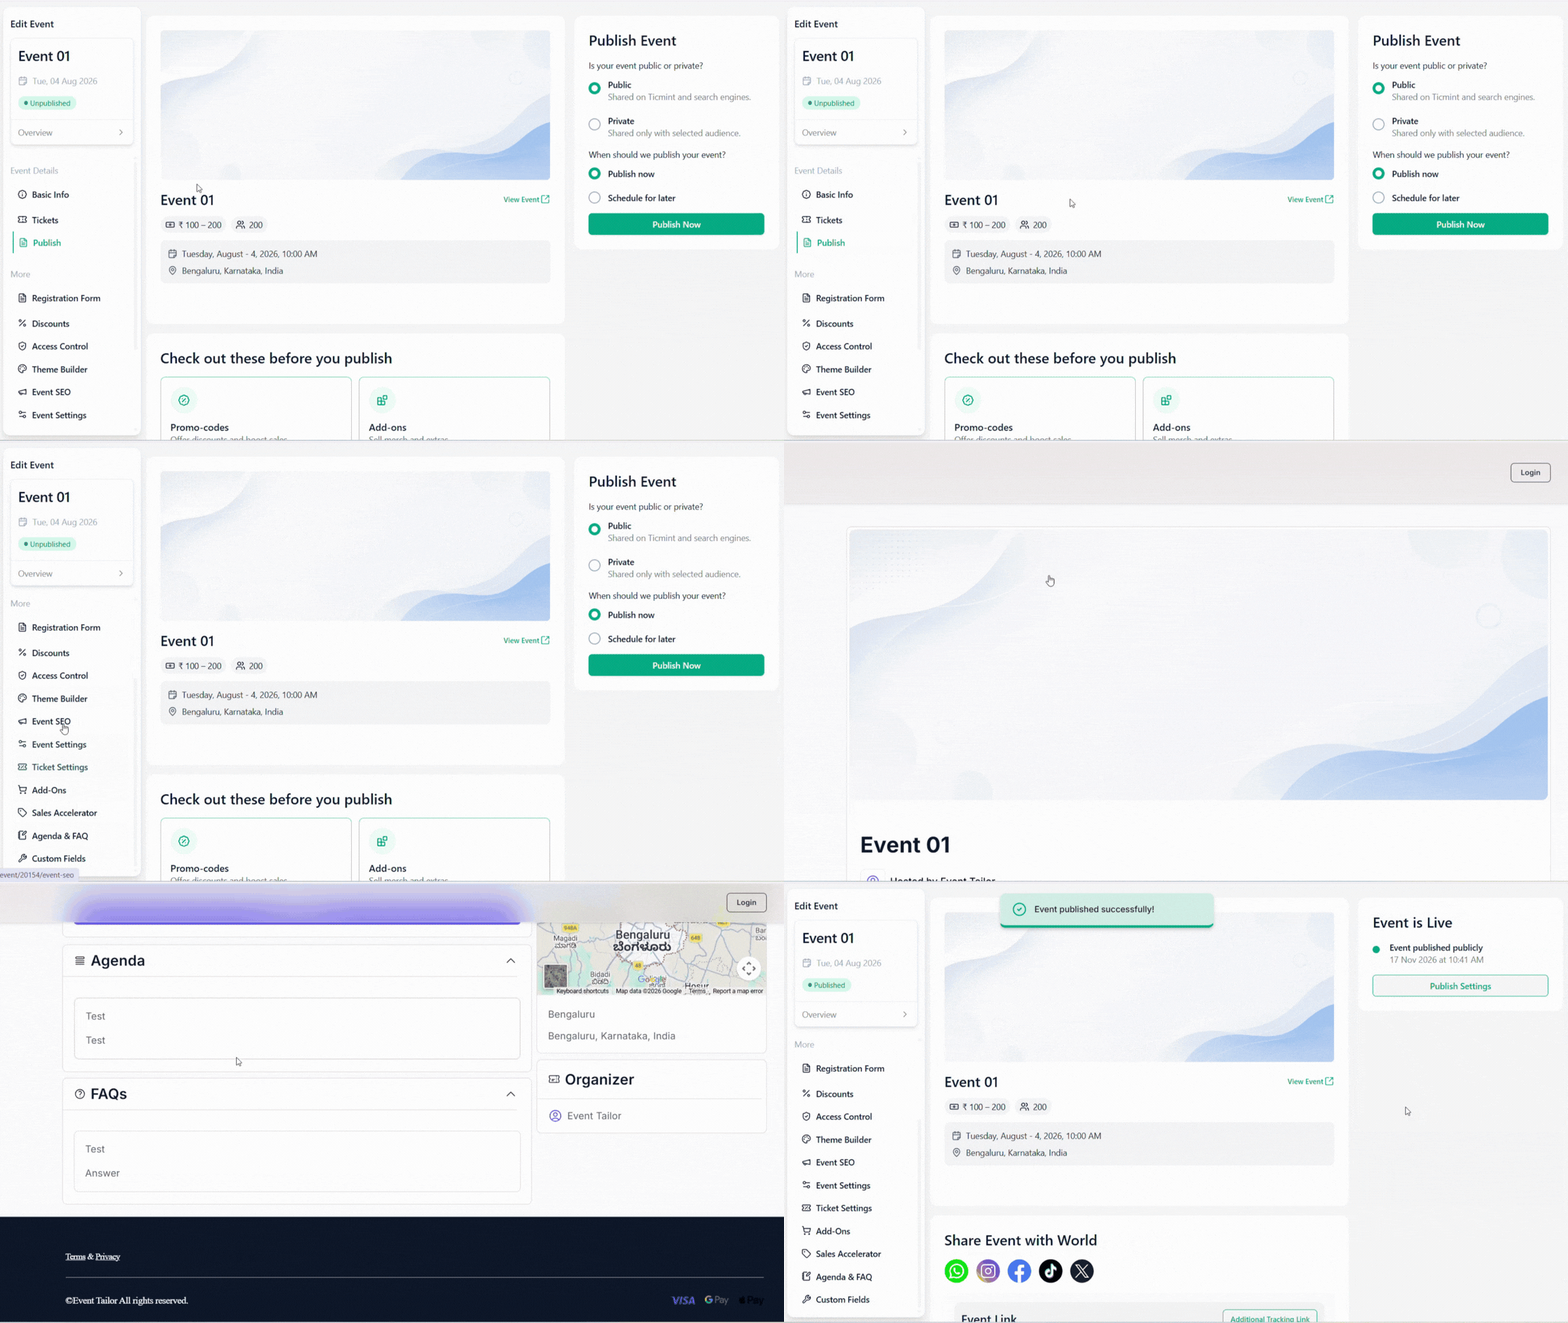
12. After Publishing Your Event
Once your event is successfully published, you can start sharing it with attendees.
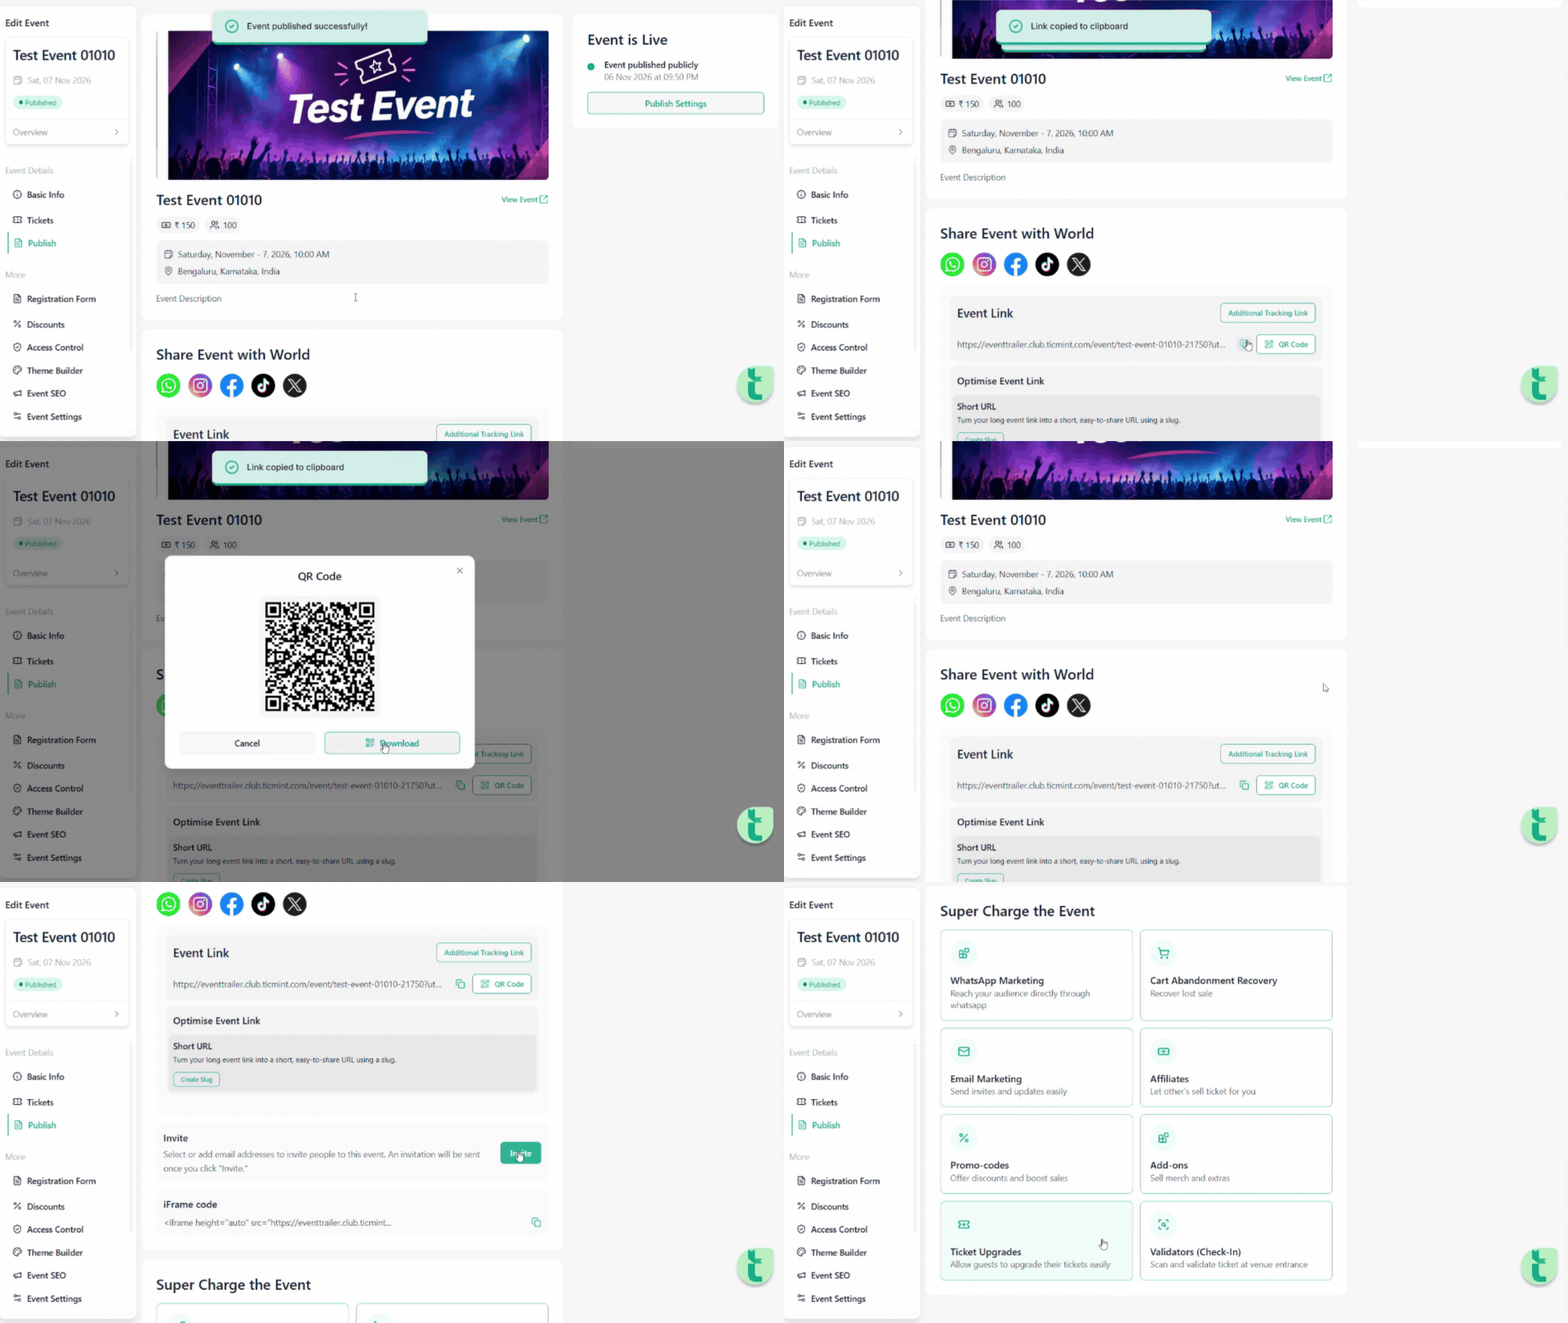
12.1 Share Your Event
You can promote your event using:
Event Link
QR Code
WhatsApp
Instagram
Facebook
X (Twitter)
12.2 Additional Sharing Options
You can also:
Send event invitations through email.
Use the iFrame code to embed your event on your website.
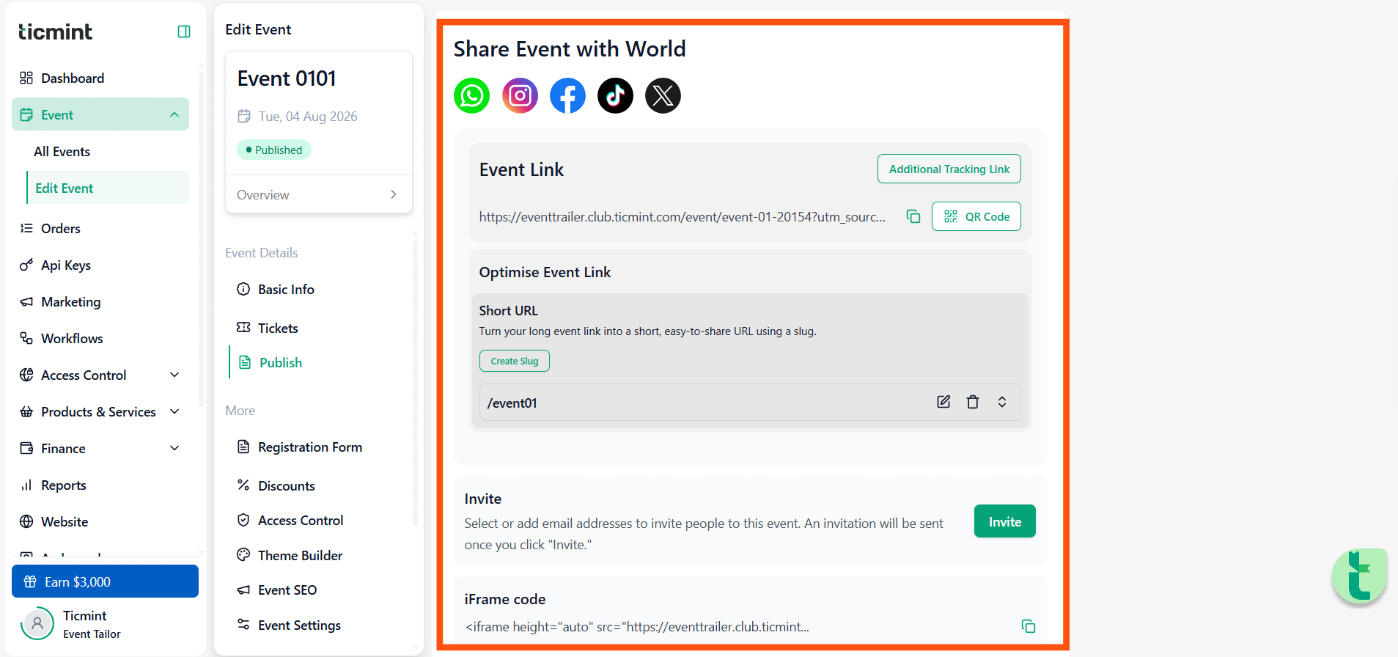
Event sharing options showing link, QR code, social sharing & Others
13. Managing Your Published Event
You can manage your event even after it has been published.
Navigate to the event dashboard and access Publish Settings.
You can use these settings to:
Unpublish the event.
Modify publishing settings.
Update event visibility.
Change publishing schedules.
Make sure to review the changes before saving.
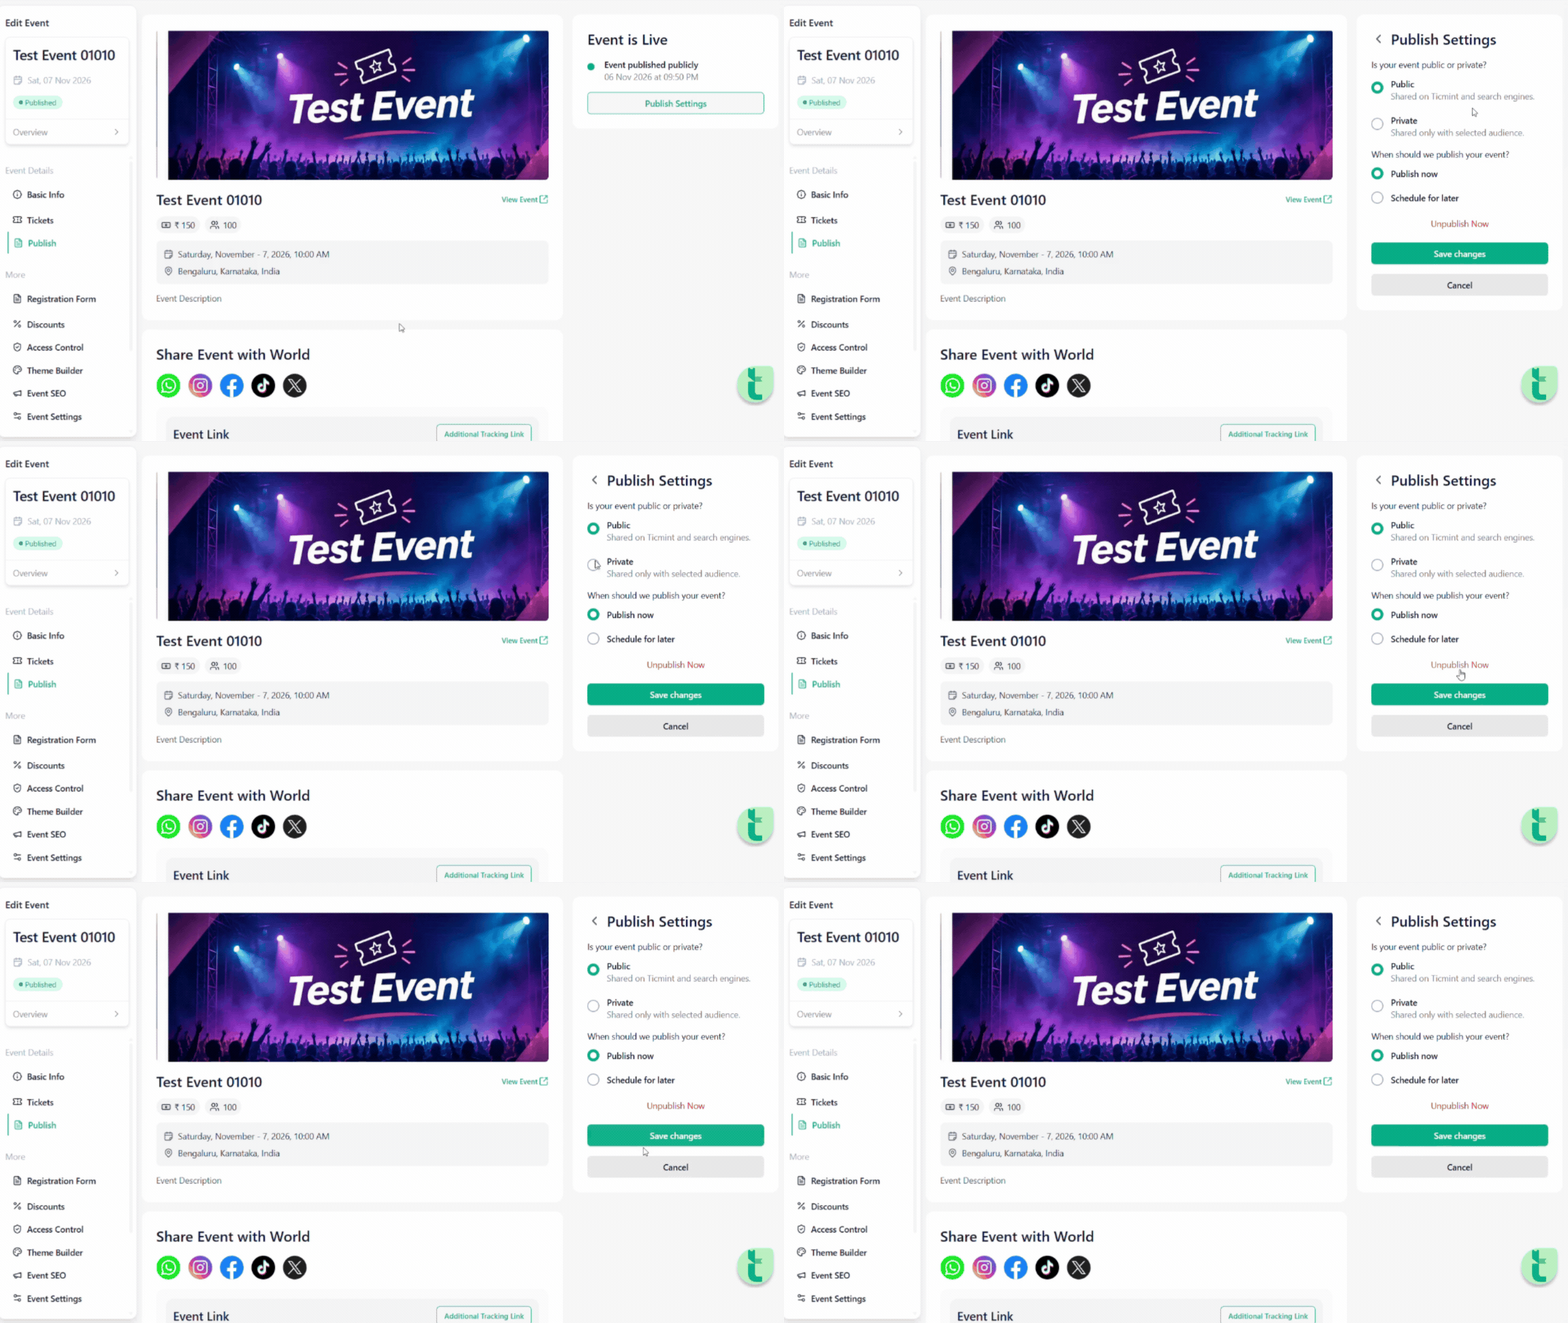
Publish Settings
14. Final Checklist Before Going Live
Before sharing your event with attendees, verify the following:
Event name and description are correct.
Event banner and images are uploaded.
Event date and time are correct.
Venue or online meeting details are correct.
Correct organisation is selected.
Sections and ticket types are configured.
Ticket prices and quantities are correct.
Ticket sales start and end dates are configured.
Taxes are configured, if applicable.
Event visibility is selected.
Event preview has been checked.
Registration and checkout have been tested.
Event is published or scheduled correctly
Need Help?
If you need assistance creating or configuring your event, please contact the Ticmint Support Team.
Ticmint Support: https://support.ticmint.com/
We are happy to help you make your event successful!
Was this article helpful?
That’s Great!
Thank you for your feedback
Sorry! We couldn't be helpful
Thank you for your feedback
Feedback sent
We appreciate your effort and will try to fix the article