Overview
Ticmint allows event organisers to create and manage different types of tickets based on their event requirements.
You can configure ticket categories, pricing, ticket limits, taxes, visibility, sales periods and bundle tickets.
This guide walks you through the complete ticket setup process.
PART 1 – Create Sections & Tickets
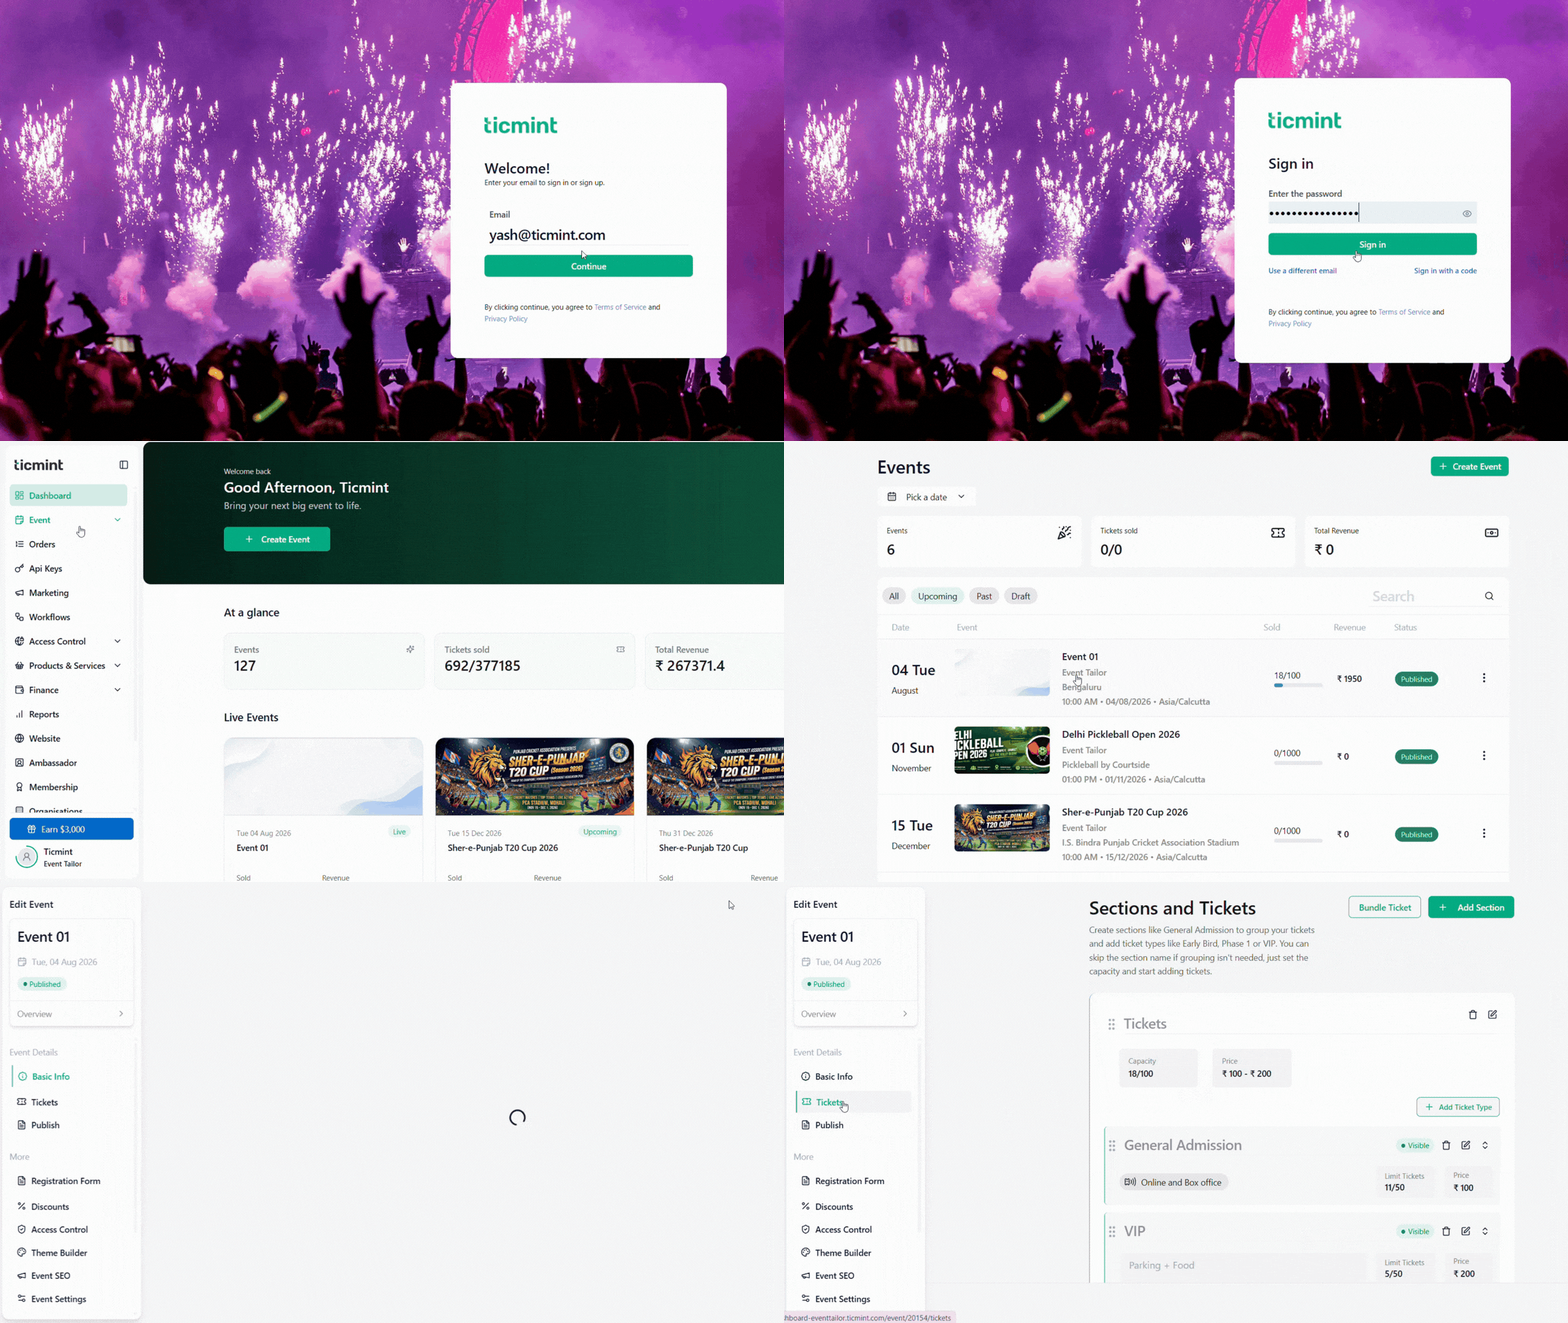
Step 1: Navigate to Ticket
Log in to your Ticmint account.
Navigate to Events.
Select the event you want to configure.
Click Edit.
Navigate to the Tickets tab.
For new events: Complete the Basic Information section and proceed to Tickets.
For existing events: Open the event and select Edit Event.
Step 2: Create a Ticket Section
Sections help organise different ticket categories under a common heading.
For example:
General Admission
VIP
Early Bird
Premium
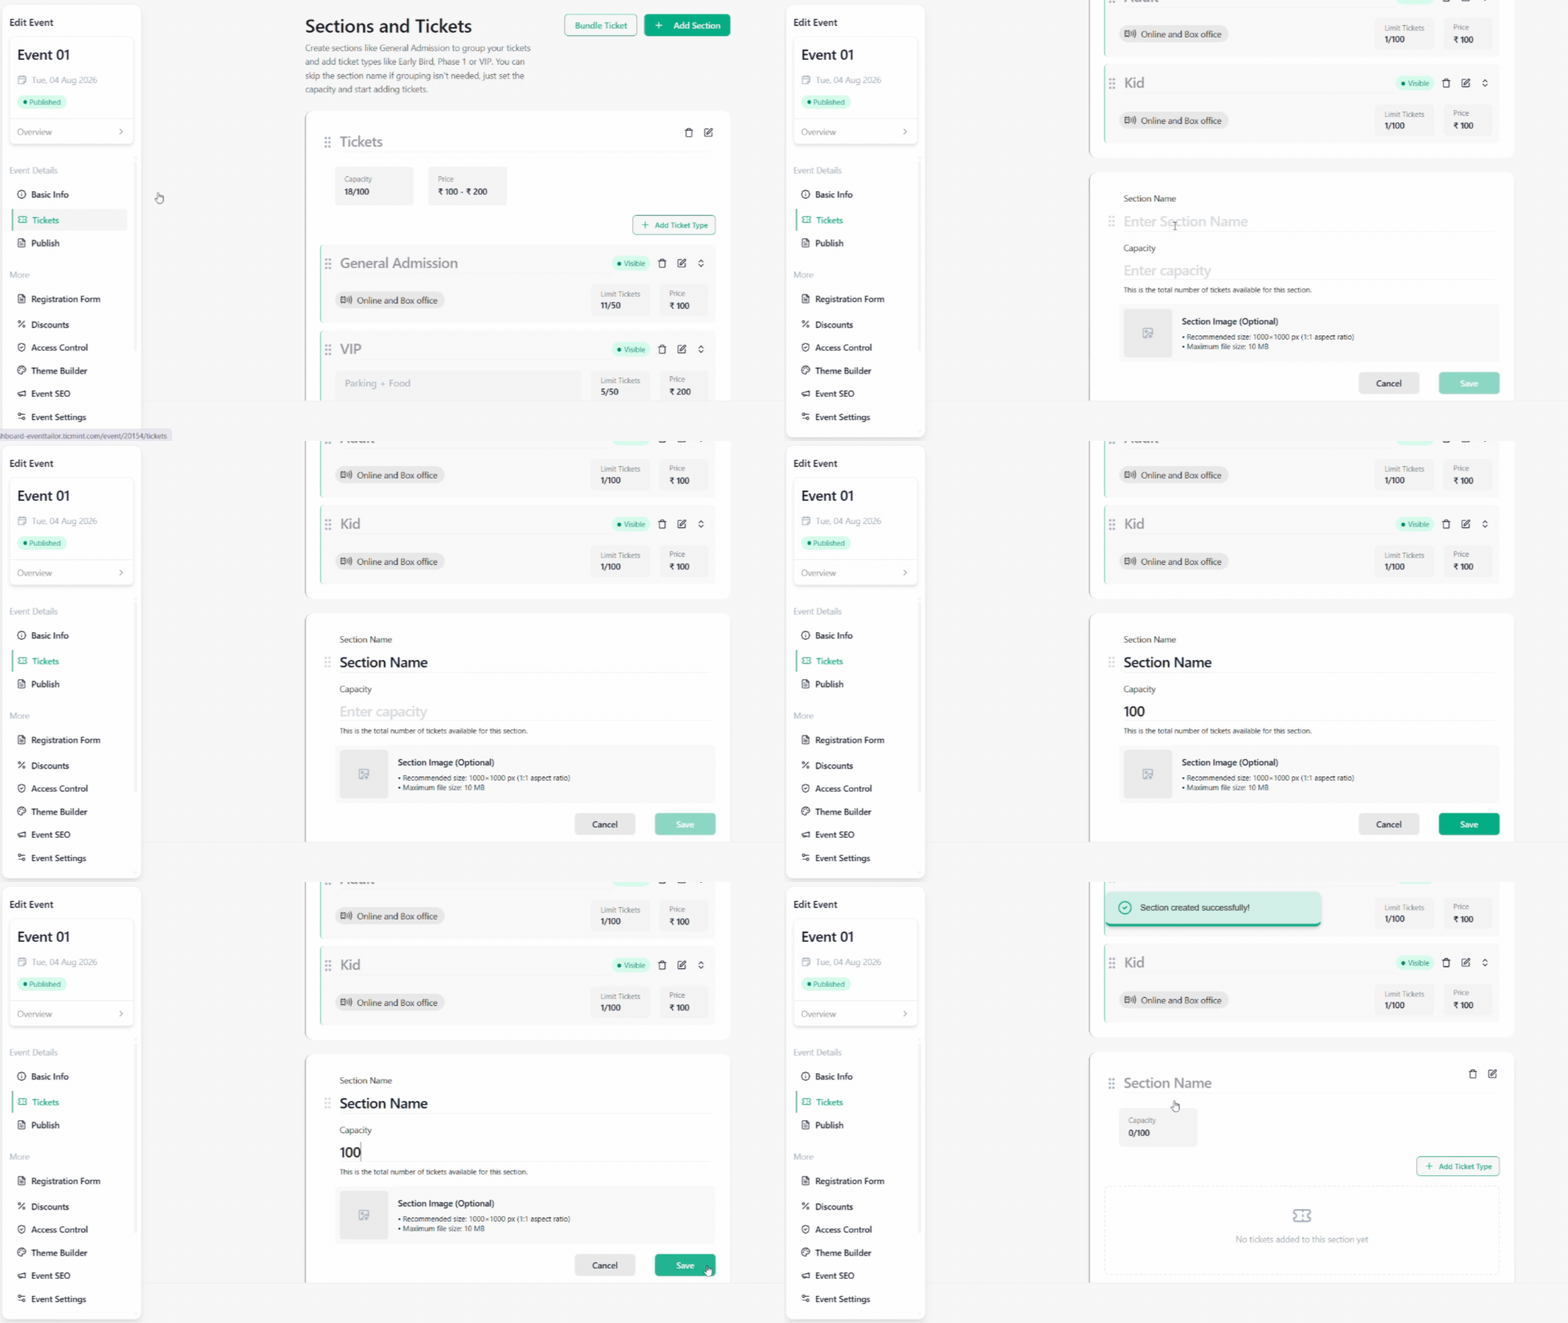
Follow these steps:
Click + Add Section.
Enter the Section Name.
Enter the Section Capacity.
Upload a Section Image (optional).
Click Save.
Note: If you don't need to group tickets into sections, you can skip the section name and simply configure the capacity before adding ticket types.
Step 3: Add a Ticket Type
Once your section is created, you can add ticket types under it.
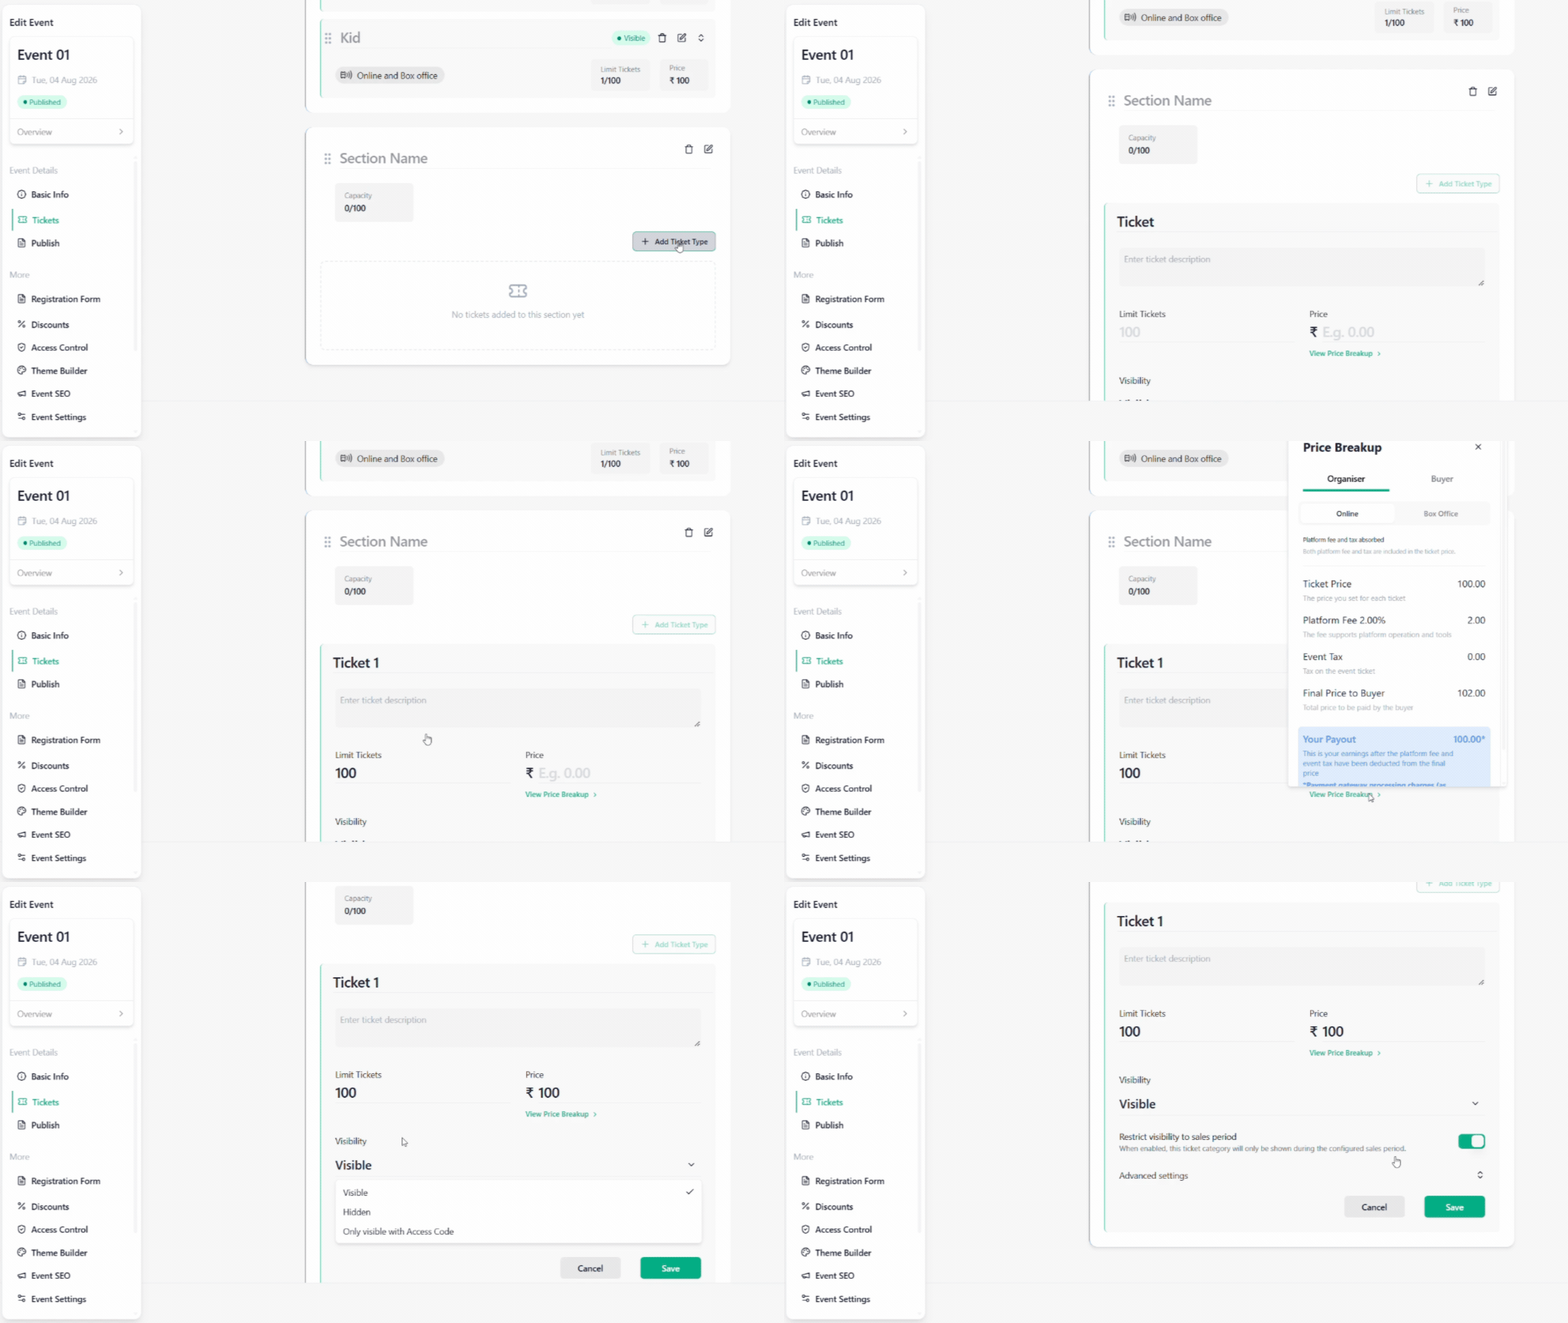
Click Add Ticket Type.
Enter the Ticket Name.
Enter the Ticket Limit.
Enter the Ticket Price.
Click View to check the price breakdown.
Select the required Visibility from the dropdown.
Enable Restrict visibility to sales period if required. When enabled, this ticket category will only be shown during the configured sales period.
Step 4: Configure Advanced Settings
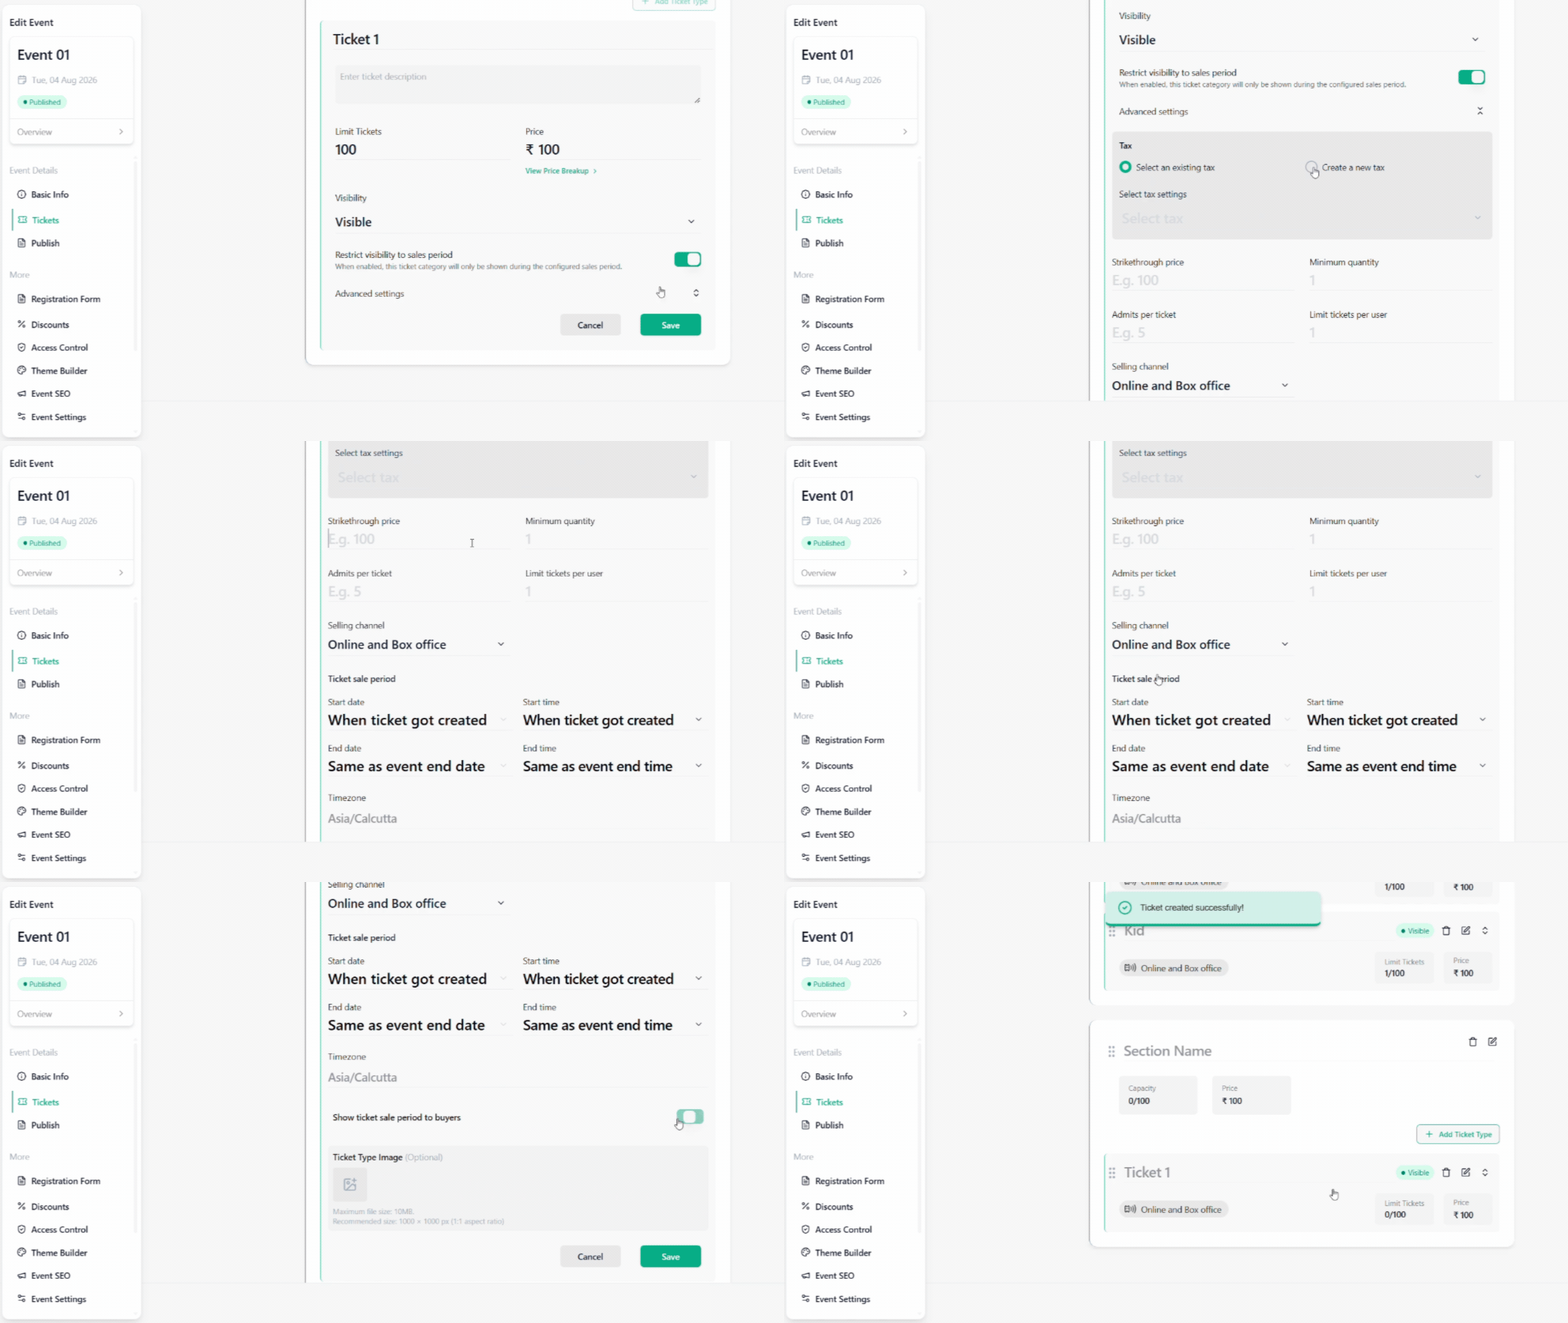
Click Advanced Settings to customise your ticket configuration.
4.1 Tax Configuration
You can configure taxes using either of the following options.
Option A – Use Existing Tax
Select Existing Tax.
Choose the required tax from the Select Tax dropdown.
Option B – Create New Tax
Select Create New Tax.
Select the Region.
Enter the Tax Label.
Enter the Tax Rate (%).
4.2 Additional Ticket Settings
Configure the following options according to your event requirements.
| Setting | Description |
|---|---|
| Strikethrough Price | Configure an original or comparison price. |
| Minimum Quantity | Set the minimum purchase quantity. |
| Maximum Quantity | Set the maximum purchase quantity. |
| Admits Per Ticket | Specify the number of people admitted per ticket. |
| Limit Tickets Per User | Restrict ticket purchases per user. |
| Selling Channel | Configure the applicable selling channel. |
| Sale Start Date & Time | Set when ticket sales begin. |
| Sale End Date & Time | Set when ticket sales end. |
| Show Ticket Sale Period to Buyers | Display the ticket sales period to customers. |
| Stock Ticket | Manage and track ticket inventory separately. |
Ticket Type Image (Optional)
You can upload an image for your ticket type.
Recommended specifications:
Image Size: 1000 × 1000 px
Aspect Ratio: 1:1
Maximum File Size: 10 MB
Once all the required settings are configured, click Save.
Step 5: Create Additional Sections (Optional)
If your event has multiple ticket categories, you can create additional sections.
Click + Add Section at the top-right corner.
Enter the new Section Name.
Set the Section Capacity.
Add ticket types under the new section.
Repeat the process as required.
PART 2 – Bundle Ticket Setup
Step 6: Understand Bundle Tickets
Bundle Tickets allow organisers to combine multiple ticket types into a single package.
Example:
A package can include:
2 General Admission Tickets
1 VIP Ticket
Attendees can purchase the package as a single bundle.
Important: Before creating a bundle:
Create the individual ticket types normally.
Set those tickets to Hidden if you do not want attendees to purchase them separately.
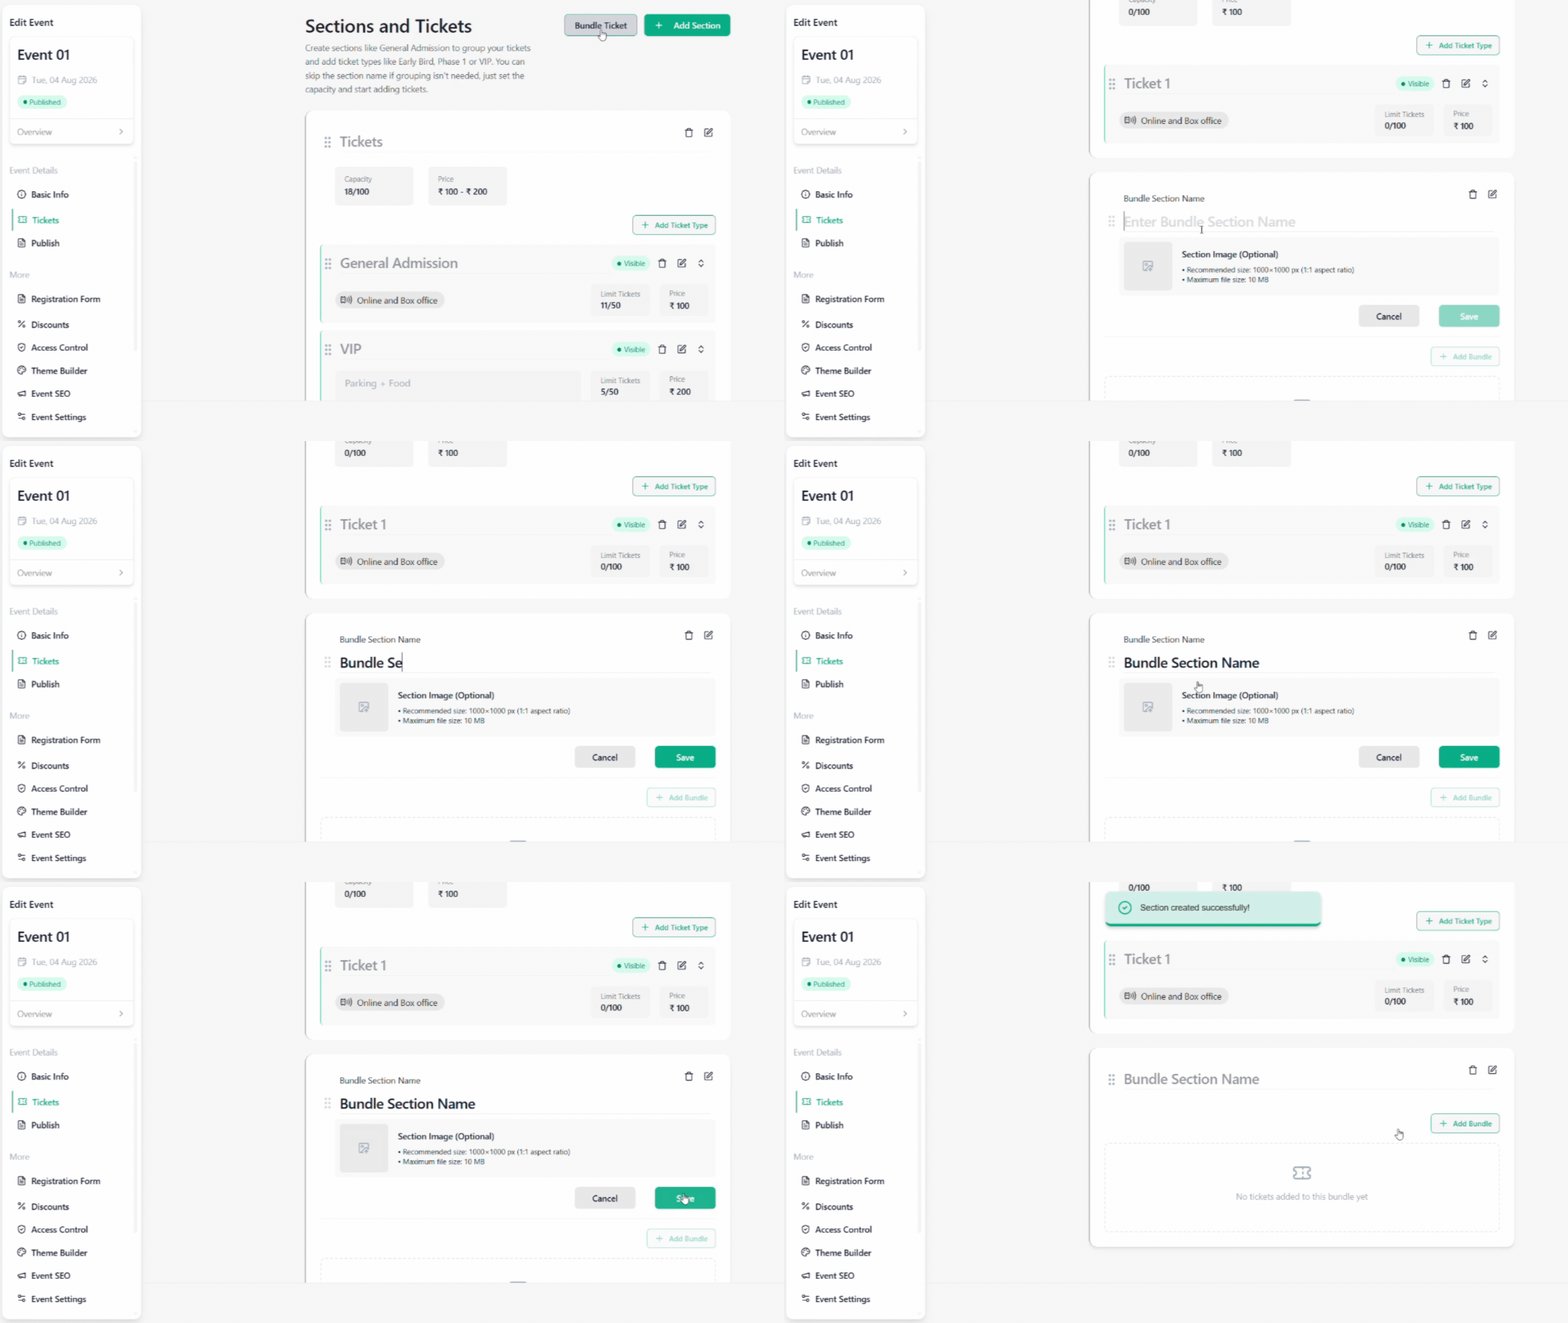
Step 7: Create a Bundle Section
Navigate to the Tickets page.
Click Bundle Ticket at the top-right corner.
Enter the Bundle Section Name.
Upload a Bundle Section Image (optional).
Click Save.
Recommended image specifications:
Image Size: 1000 × 1000 px
Aspect Ratio: 1:1
Maximum File Size: 10 MB
Step 8: Add a Bundle & Select Tickets
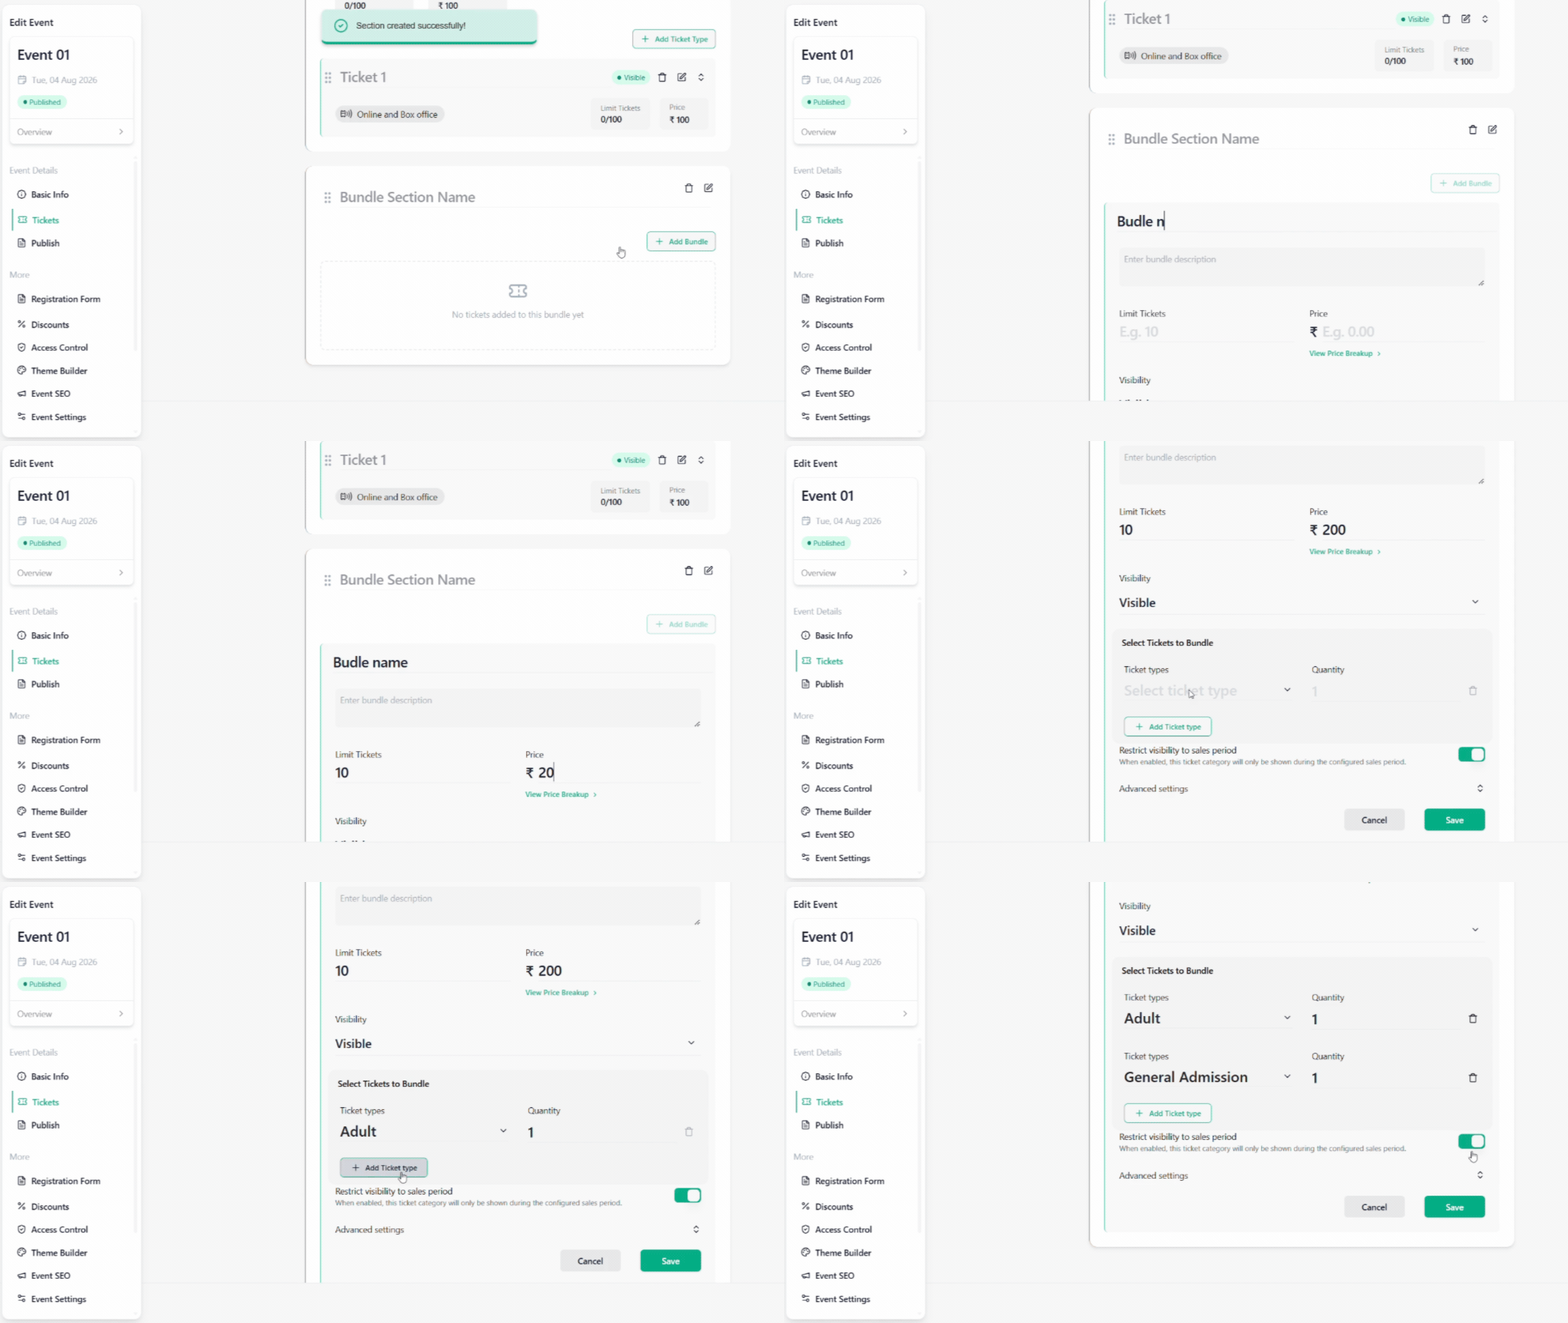
After creating the bundle section:
Click + Add Bundle.
Enter the Bundle Name, Bundle Ticket Limit and Bundle Price.
Click View to review the price breakdown.
Select the required Visibility.
Enable Restrict visibility to sales period if required. When enabled, the bundle will only be displayed during the configured sales period.
Select Custom Slots or All Slots.
Under Select Tickets to Bundle, choose the required ticket type.
Enter the Quantity for each ticket type.
Click + Add Ticket Type to include additional ticket types.
Repeat until all required tickets are added.
Step 9: Configure Bundle Advanced Settings
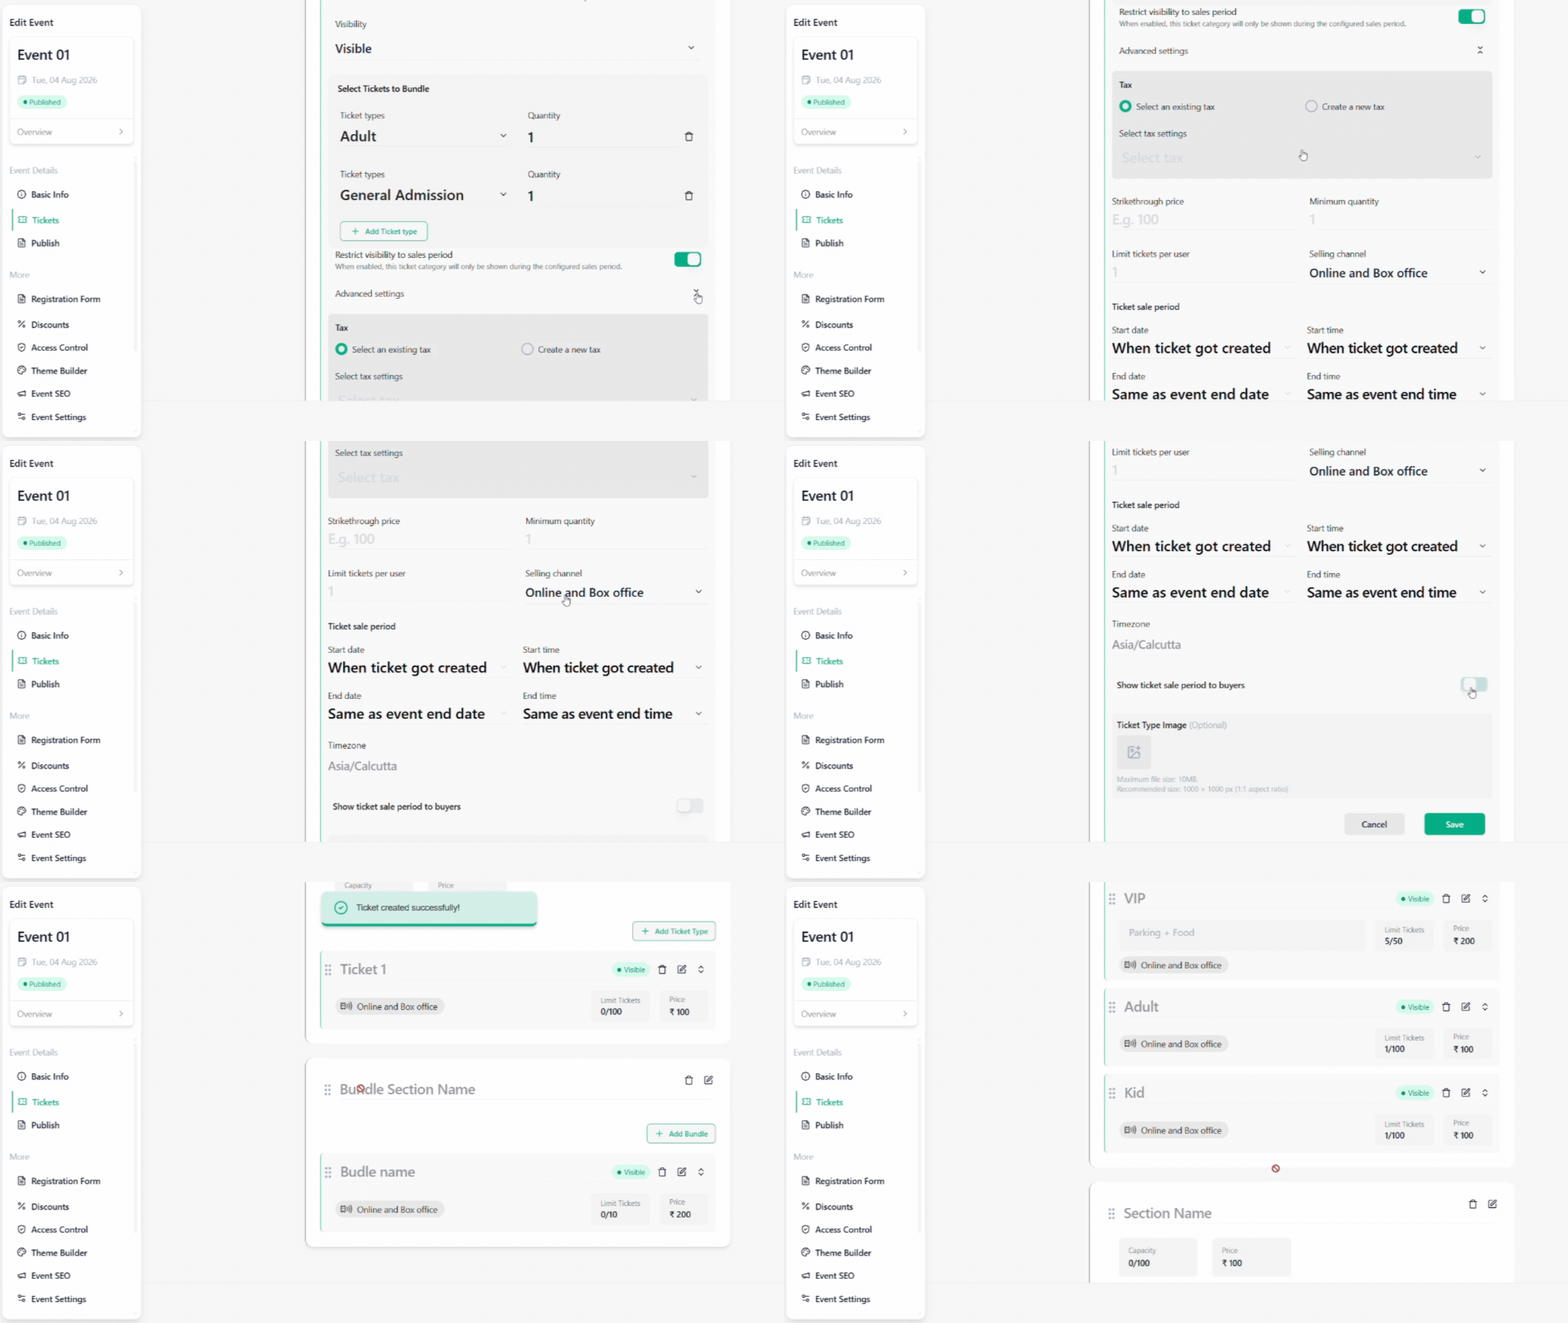
Click Advanced Settings to configure the bundle.
9.1 Tax Configuration
Use Existing Tax
Select Existing Tax.
Choose the required tax from the dropdown.
Create New Tax
Select Create New Tax.
Select the Region.
Enter the Tax Label.
Enter the Tax Rate (%).
9.2 Additional Bundle Settings
Configure the following options as required:
Strikethrough Price
Minimum Quantity
Maximum Quantity
Admits Per Ticket
Limit Tickets Per User
Selling Channel
Sale Start Date & Time
Sale End Date & Time
Show Ticket Sale Period to Buyers
Stock Ticket
Ticket Type Image (optional)
Ticket Image Specifications:
Image Size: 1000 × 1000 px
Aspect Ratio: 1:1
Maximum File Size: 10 MB
Review all details and click Save to create the bundle ticket.
PART 3 – Final Verification
Step 10: Verify Your Ticket Configuration
Before sharing your event page, verify the following:
All ticket sections are created correctly.
Ticket names, limits and prices are accurate.
Ticket visibility is configured correctly.
Tax settings are correct.
Ticket sale start and end dates are configured.
Purchase quantity limits are correct.
Bundle tickets contain the correct ticket types.
Bundle quantities and prices are correct.
All changes have been saved.
Important Notes
Tickets sold through the Box Office will generate only a ticket number and will not be included in revenue, sales reports or analytics.
Bundle tickets will appear on the event page according to their configured visibility settings.
Individual tickets can be set to Hidden if they should only be available through a bundle.
Conclusion
Your event tickets and bundle tickets are now configured.
You can use these settings to manage ticket categories, pricing, inventory, sales periods and ticket packages according to your event requirements.
For further assistance, refer to the Ticmint Support Portal.
Was this article helpful?
That’s Great!
Thank you for your feedback
Sorry! We couldn't be helpful
Thank you for your feedback
Feedback sent
We appreciate your effort and will try to fix the article